How to Turn Google Slides Into a Video [4 Easy Ways]
- Last updated June 5, 2023
Google Slides is a great presentation tool that offers a lot of features like auto-play and object and slide animations. However, one feature it’s lacking is the ability to convert the slides into a video.
Converting your PowerPoint to video is a great way to preserve and share your presentation, especially if you’re doing it for an online class. Unlike PowerPoint, Google Slides doesn’t allow you to export the slides as video.
However, it is possible to do it, and in this tutorial, we’ll show you how to turn Google Slides into a video in 4 different ways.
Table of Contents

How to Convert Google Slides to Video
Here’s how to save a Google Slides presentation as a video:
- Use the keyboard shortcut Win + G to open the screen recorder settings
- Click on the mic icon to unmute and be able to record the sound.
- Open your Google Slides presentation in a web browser.
- Adjust the browser window size to fit the desired video dimensions.
- Click Slideshow and go into Presentation mode.
- Use the keyboard shortcut Win + Alt + R to start the screen recording.
Make sure that the mic is not muted so that you can record sound.
- Start your presentation by going through each slide as you would during a regular presentation.
- Click the Square icon to stop the screen recording.
- Go to your file explorer to access the video.
How to Turn Google Slides Into a Video
In this tutorial, we’ll be showing you 4 methods for how to make Google Slides into a video:
- Using the screen recorder
- Exporting to Powerpoint
- Using the Creator Studio add-on
- Using a video editor
Method 1: Using the Screen Recorder
For the first method, you can use a screen recorder to convert your Google Slides into a video. Most devices come with an inbuilt screen recorder, and you can access this in the Start Window or by using the keyboard shortcut Win + Alt + R for Windows.
You can also record sound with your screen recorder, but you might need to set it up first. If you want to turn your Google Slides presentation into a video using screen recording, follow these steps::
Step 1: Use the keyboard shortcut Win + G to open the screen recorder settings
Step 2: Click on the mic icon to unmute and be able to record the sound.
Step 3: Open your Google Slides presentation in a web browser.
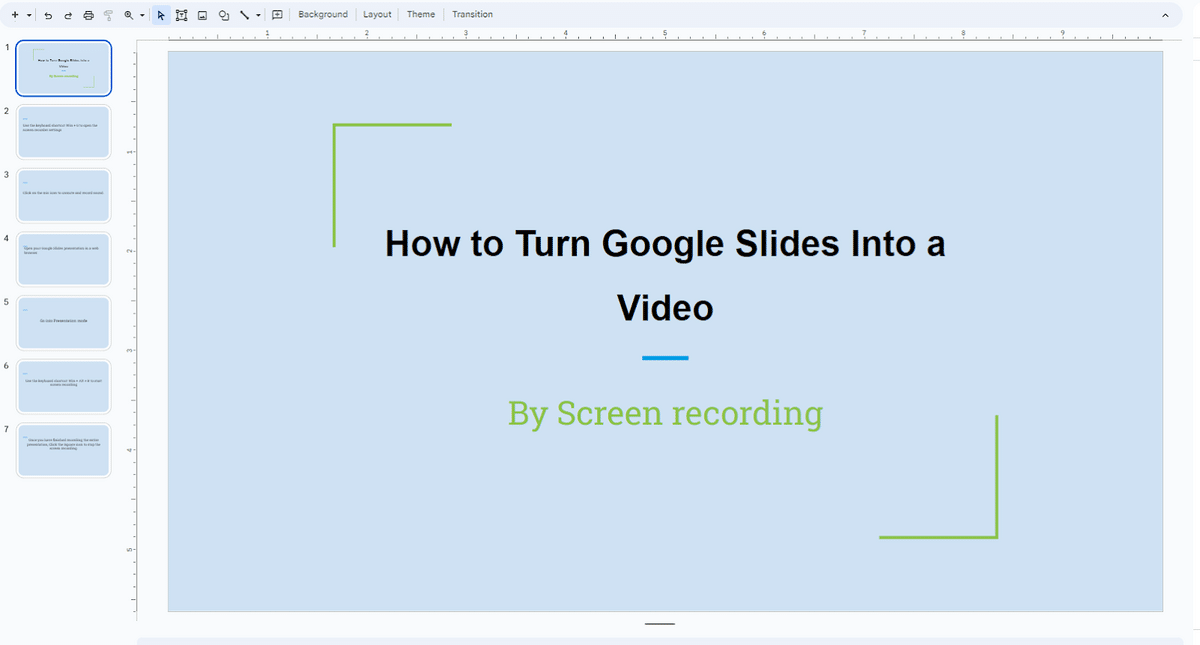
Step 4: Adjust the browser window size to fit the desired video dimensions.
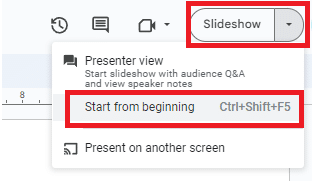
Step 5: Click Slideshow and choose Start from the beginning to go into Presentation mode.
Step 6: Use the keyboard shortcut Win + Alt + R to start the screen recording.

Step 7: Start your presentation by going through each slide as you would during a regular presentation.
Step 8: Once you have finished recording the entire presentation, Click the Square icon to stop the screen recording.

Step 9: Go to your file explorer to access the video. Usually, after stopping the recording, a green bar will appear that should take you to the video, but if you miss this, you can go to your file explorers and open the video. You’ll most likely find the video in the folder named Captures .
Make sure to speak clearly and confidently, providing narration or explanations as you go through the slides. Use the screen recording software’s editing capabilities to trim the video, remove any unwanted sections, or make any necessary adjustments.
Once you’re done editing, you can export the edited video in your preferred video formats , such as MP4.
Method 2: Using Powerpoint
Unlike Google Sheets, Microsoft Powerpoint can actually export a presentation as a video , so if you have your presentation in Google Slides, you can convert it to Powerpoint and then export it as a video.
Here’s how to turn a Google Slide into a video using Powerpoint:
Step 1: Open your Google Slides presentation in your web browser.
Step 2: Go to File > Download and choose Microsoft Powerpoint .

Step 3: Open Microsoft PowerPoint on your computer.
Step 4: Go to the File > Open and locate the file on your PC.
Step 5: Once the file is open, go to File > Export .
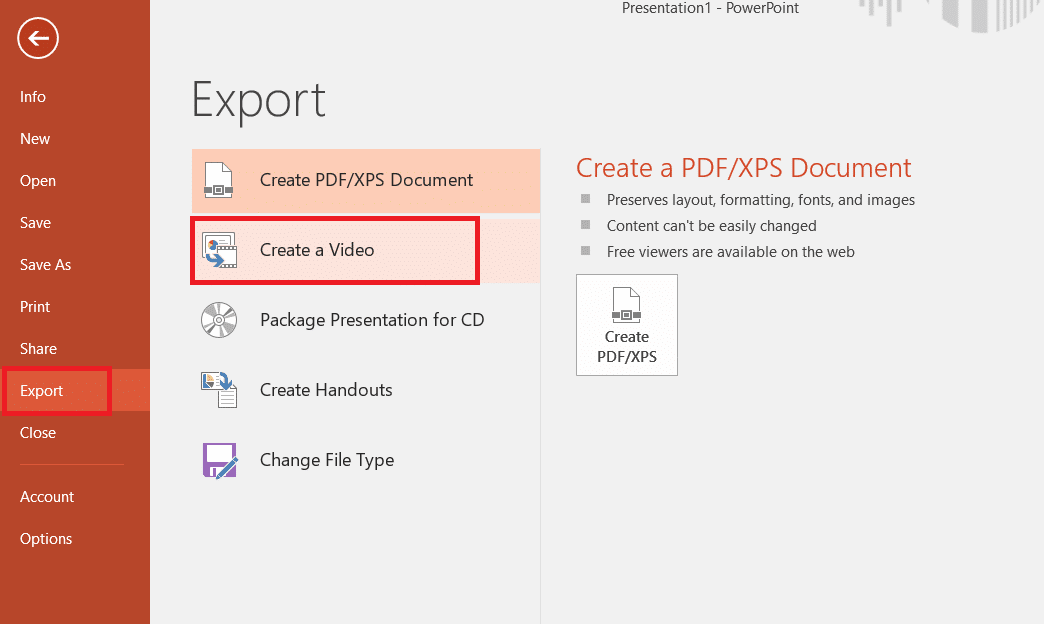
Step 6: Set the video setting, then click Create Video .
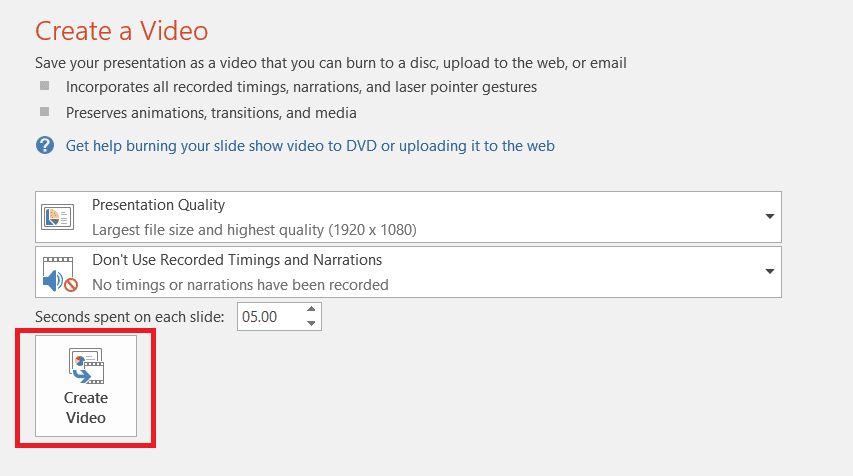
Step 7: Specify the file name, location, and format for your video.
Step 8: Click Save to start the conversion process.
Step 9: Once you’re done, you can use a video editor to add voiceover to the video.
Related: how to convert PowerPoint to Google Slides
Method 3: Using the Creator Studio Add-On
The Creator Studio add-on is a powerful tool designed to enhance your experience with Google Slides.
Follow the steps below to download Google Slides as video:
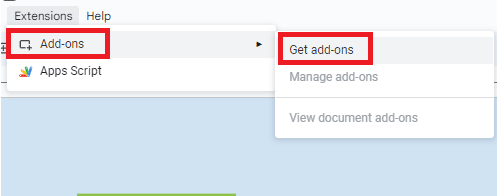
Step 1: Go to Extensions > Add-ons.
Step 2: Click Get add-ons.
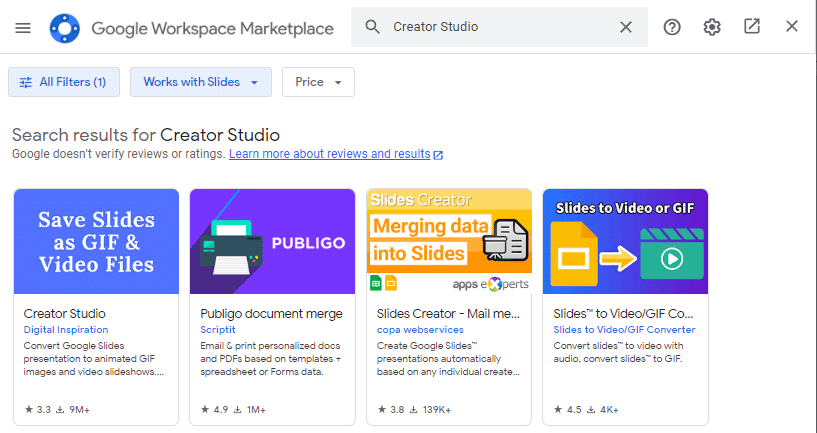
Step 3: Type Creator Studio in the Google marketplace window to search.
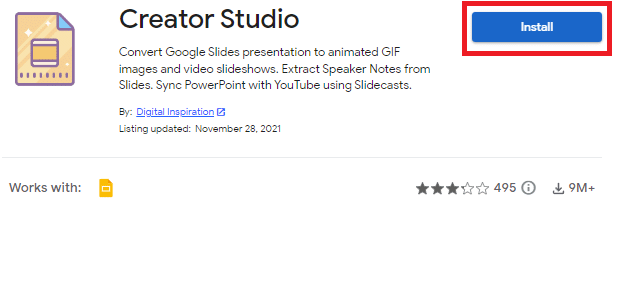
Step 4: Click Install .
Step 5: Allow permissions for Creator Studio by signing in to your Google account.

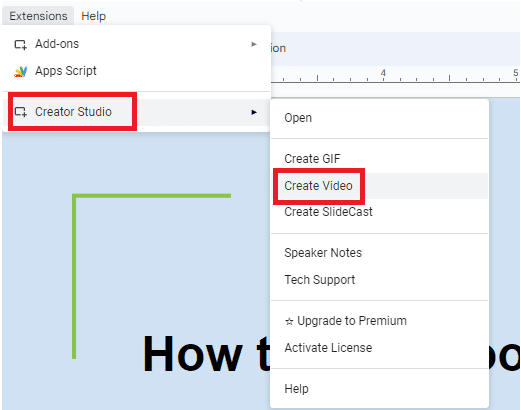
Step 6: Go to Extensions.
Step 7: Click on Creator Studio and choose Create Video.
Step 8: Input the setting for the video, and if you have pre-recorded audio, you can add it by choosing the option Video with audio .
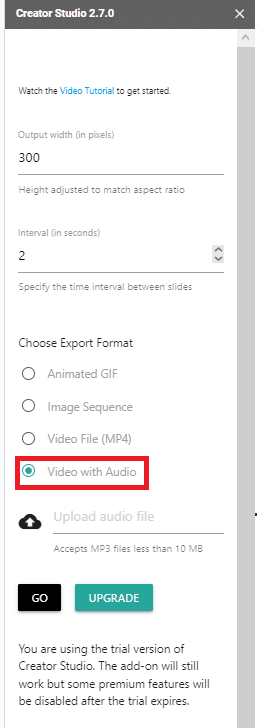
Step 9: Click Go .
Step 10: Once the video has been rendered, click the download icon to download it to your device.
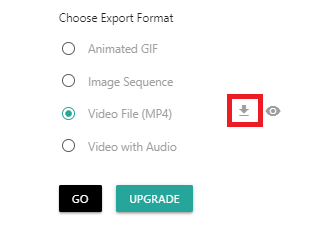
Voila! You now have your Google Slide converted into a video on your device. However, keep in mind that the option for Video with Audio is a paid-for option and will be unavailable once the trial period ends.
Method 4: Using a Video Editor
This method will require you to download your Google Slides as images. You can use any editor you’re familiar with or have access to. Some good video editors include Adobe, Da Vinci, and Shotcut.
You can download any one of these video editor tools
Here’s how to make a video with Google Slides using a video editor:
Step 1: Go to File > Download.
Step 2: Choose either the JPEG image or Png image format.
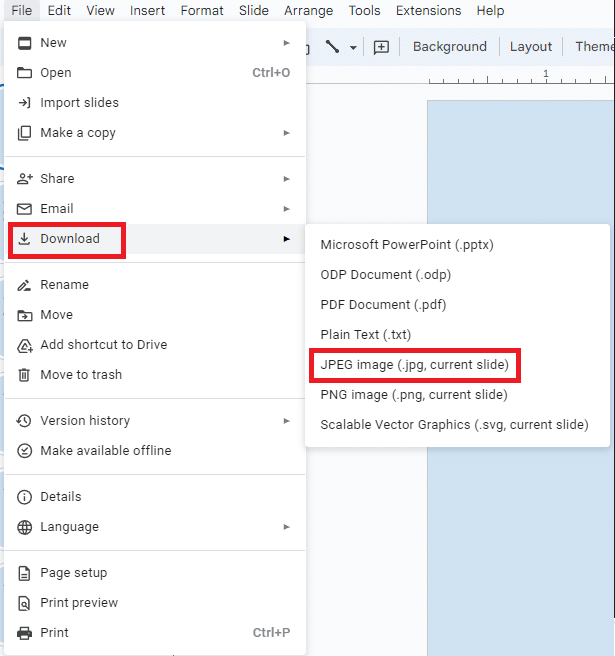
Step 3 : Choose the file location and save. You can also create a new folder for the images.

Step 4: Repeat the process for all the other Slides.
Step 5: Record the voice-over for the presentation using your device’s recorder and save the file.
Step 6: Open your video editor. In this tutorial, we’ll be using Shotcut.
Step 7: Import your images into the video editor. In Shotcut, you can simply drag and drop the image files.
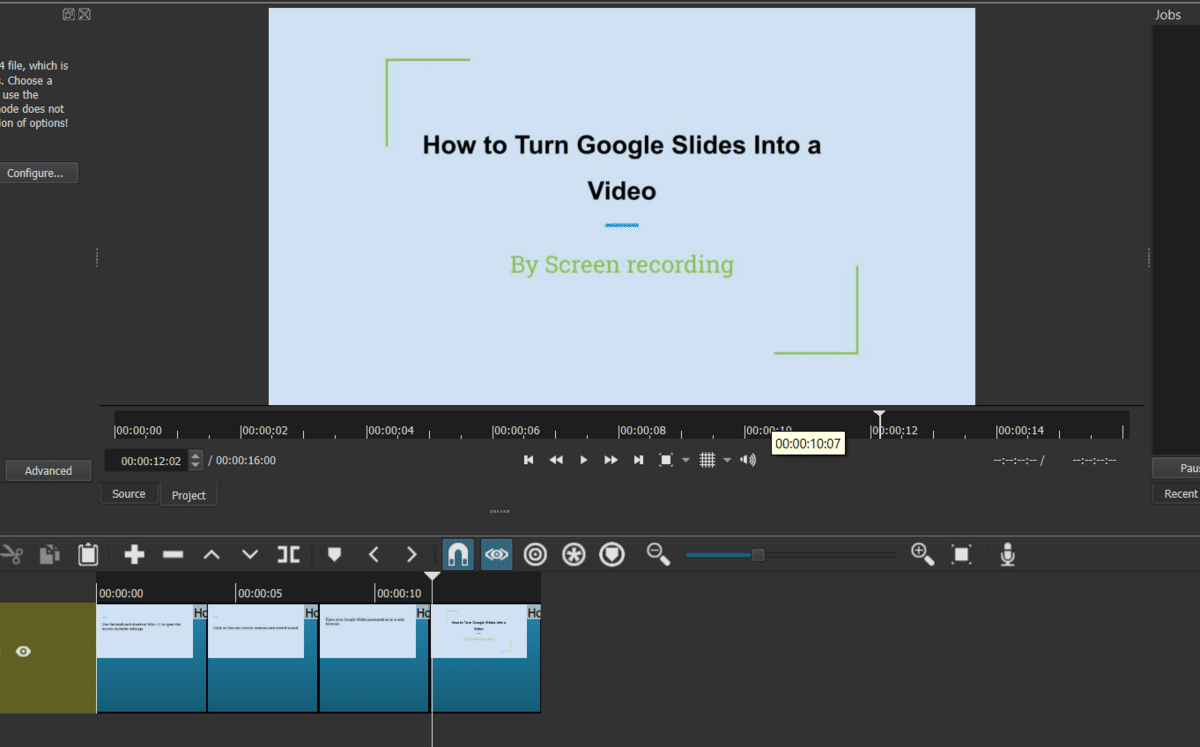
Step 8: Import your audio into the video editor.
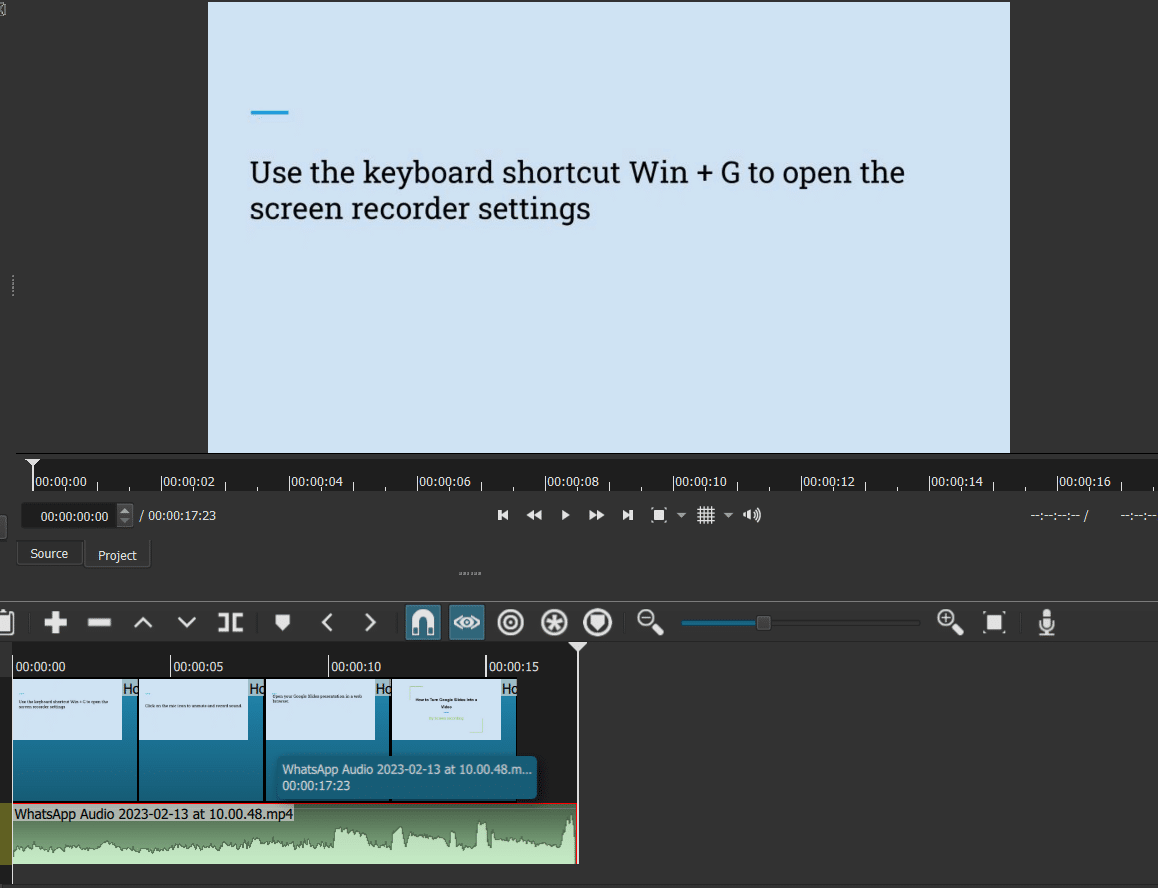
Step 9: Align the images and the audio. You can also play around with effects and transitions.
Step 10: Export the video.

Although this method is probably longer than the other methods and may require some editing skills, it’s also more customizable, and you can play with things like transitions between your slides and effects depending on the video editor you’re using.
Frequently Asked Questions
How to turn a google slides into a video with voiceover.
To save Google Slides as video:
- Use the keyboard shortcut Win + G to open the screen recorder settings.
What Is the Best Way to Convert Google Slides Into a Video?
The best way to turn Google Slides into video is by using the screen recorder. You can start your presentation as usual and turn on the screen recorder to record the whole presentation on your screen. Make sure to turn on the mic so that the screen recorder can record your voice as well.
This method is easier than exporting the slides and adding the audio later. However, the quality might not be the greatest.
Can a Google Slides Presentation Be Used as a Video File?
Not directly, but with some manipulation, yes, Google Slides presentations can be used as video files. While Google Slides does not have a direct built-in feature to export presentations as video files, you can still convert your Google Slides into video format using the other methods listed in this article.
Wrapping Up
Converting Google Slides into videos expands your options for sharing and presenting your content dynamically.
It also allows you to preserve your presentation and share it on Youtube and other places. In this tutorial, we’ve shown you how to turn Google Slide into a video in 4 different ways.
You can experiment with different effects, transitions, and visual enhancements to create compelling videos that capture your audience’s attention.
If you enjoyed this tutorial on how to turn Google Slides into a video, you should also check out our premium templates that can save you a ton of time and energy. Remember to use the code SSP at checkout to save 50%.
Get Premium Templates
- How To Add a Video in Google Slides
- Is Google Slides or PowerPoint Better?
- Learn How to Draw on Google Slides in 2 Minutes (Too Easy)
- How to Make Google Slides Vertical
- How to Make a Shape Transparent in Google Slides
- How To Add a Video to Google Docs [3 Easy Methods]
Most Popular Posts

How To Highlight Duplicates in Google Sheets

How to Make Multiple Selection Drop-Down Lists in Google Sheets

Google Sheets Currency Conversion: The Easy Method

How To Apply a Formula to an Entire Column in Google Sheets
Related posts.
Google Sheets vs Excel – Which Is Better In 2025?
- Sumit Bansal
- December 16, 2024
Excel Tips Every Small Business Owner Needs for Tax Season
- December 10, 2024
The Surprising Limitations of Google Sheets
- November 20, 2024
- November 19, 2024
Thanks for visiting! We’re happy to answer your spreadsheet questions. We specialize in formulas for Google Sheets, our own spreadsheet templates, and time-saving Excel tips.
Note that we’re supported by our audience. When you purchase through links on our site, we may earn commission at no extra cost to you.
Like what we do? Share this article!
How-To Geek
How to convert google slides to a video or gif.

Quick Links
Convert using powerpoint, capture with your screen recording tool, use a google slides add-on.
While it's easy to share Google Slides using a link or publishing it to the web , you may want a single non-editable file that you can share privately. By converting the slideshow to a video or GIF, your visitors can watch it as you intended. Here are three methods to try.
Microsoft PowerPoint offers both video and GIF exporting . So, if you have PowerPoint, you can open the Google Slides presentation in it and create the video or GIF from there.
Related: How to Convert Google Slides to PowerPoint
Open your Google Slides presentation and go to File > Download. Select "Microsoft PowerPoint (.pptx)" in the pop-out menu.
Head to your downloads folder and click or double-click the file to open it in PowerPoint.
Go to File > Export. Then, choose "Create a Video" or "Create an Animated GIF."
If you pick a video, you can then use the drop-down boxes to choose the quality and whether you want to include recorded timings and narrations. You can also set the duration per slide. Click "Create Video."
If you pick a GIF, you can choose the quality, make the background transparent, set the duration per slide, and include only specific slides if you like. Click "Create GIF."
For both video and GIF, you'll then be prompted to choose a location, optionally change the name, and click "Export" when you finish. Then, grab your video or GIF and share it where you please.
If you have a screen recording tool, such as Game Bar on Windows , the Screenshot Utility on Mac , or a third-party application, you can capture your slideshow as it plays. Then, save the video file to share or turn it into a GIF using an online tool.
Related: How to Screen Record on Your Mac
Get your screen recording tool ready and select the Slideshow drop-down box at the top of Google Slides and pick "Start From beginning."
To ensure you don't see your mouse cursor in the recording when advancing through the slides, you can set it to automatically play.
When the presentation appears in full-screen mode, click the three dots on the right of the floating toolbar, move to Auto-Play, and choose the time per slide.
Then, start capturing with your screen recording tool and stop when the slideshow finishes. You can then edit or share your video.
Additionally, you can use a file converter to obtain a different video file format or turn the video into a GIF. You can use a few free online tools including Cloud Convert , Convertio , or Zamzar .
One other way to convert Google Slides to a video or GIF is with an add-on. There are a few Google Slides add-ons that you can try if you search the Google Workspace Marketplace.
One that works well and allows you to create a video or a GIF for up to five slides for free is Slides to Video .
Related: Everything You Need to Know About Google Chrome's Profile Switcher
Slides to Video works using Google Chrome with the same Google account as Google Slides. If you use a different browser, there are other add-ons such as Video and GIF From Slides and Creator Studio that each offer a free trial.
Once you install the add-on, open your presentation and go to Add-Ons in the menu. Move your cursor to Slides to Video and pick "Create Video" in the pop-out menu.
When the sidebar opens, you can choose a duration per slide or a default for all slides at the top. Then, use the Choose Your Export Type drop-down box to pick "MP4" or "GIF." Click "Create Video."
You'll see the progress as your video or GIF is created. When complete, you'll receive an email to your Gmail account and will also see a link in the sidebar to download the file.
Until Google Slides provides the export option to create a video or GIF, these workarounds can help you get the job done.
For more, learn how to add a YouTube video or how to add other types of videos and customize the playback in Google Slides.
- Google Slides
Google Slides
How to Turn Google Slides into a Video?

Table of Contents
Using slides for presentations is a popular choice. However, if you don’t plan on giving the presentation live more than once, converting it into a video might be a better option. This way, you can add your voice to the presentation, and viewers won’t have to manually click through each slide.
Videos are easier to share and don’t run into compatibility issues like slideshows might. While Google Sheets and Excel can work together, they’re not always perfectly compatible. Videos, on the other hand, can be played on almost any modern video player or platform, including YouTube.
Although Google doesn’t have this feature built-in, there are free add-ons available in Google Workplace that can do the job , or you can use an AI video presentation maker to convert your presentations into videos effortlessly.
In this guide, we’ll show you how to use one of these add-ons, along with a few more methods, to convert your presentations into videos effortlessly.
How to Convert Google Slides to Video?
Looking to take your Google Slides presentations to the next level? Converting them to videos allows you to share them more easily and create engaging content. Here are several methods to achieve this:
1. Make Use of Add-ons:
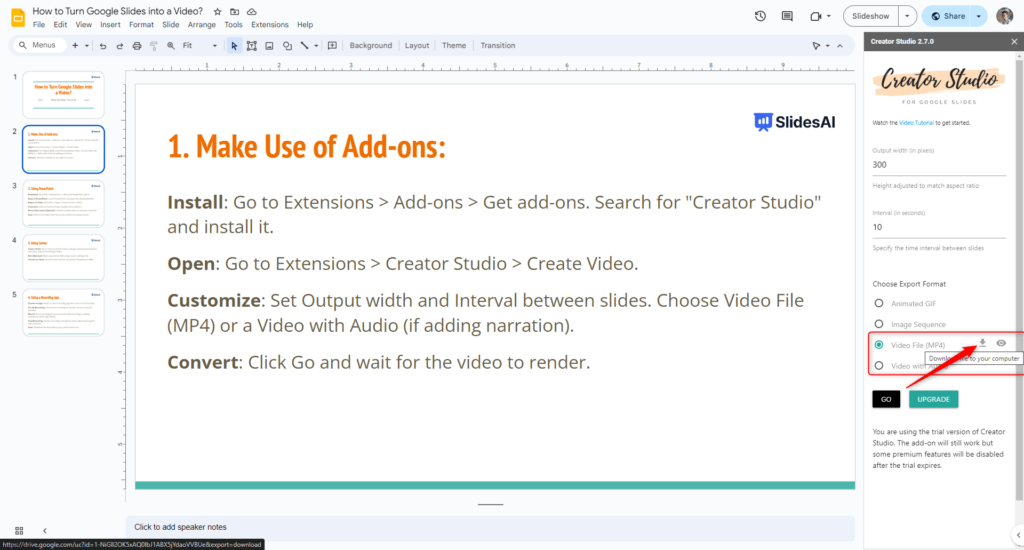
Creator Studio is a handy tool you can add to Google from the Google Workspace Marketplace. It changes Google Slides into GIF images and MP4 video files. You can also add an MP3 audio file or record your voice to narrate your presentation. When your presentation becomes a video, it will include the background sound you added. If you want to know more, take a look at the step-by-step instructions below:
Step 1 – Install: Go to Extensions > Add-ons > Get add-ons . Search for “ Creator Studio ” and install it.
Step 2 – Open: Go to Extensions > Creator Studio > Create Video .
Step 3 – Customize: Set Output width and Interval between slides . Choose Video File (MP4) or Video with Audio (if adding narration).
Step 4 – Convert: Click Go and wait for the video to render.
2. Using PowerPoint
If you have access to Microsoft PowerPoint, you can export your Google Slides presentation as a PPTX file and then use PowerPoint’s built-in “Create a Video” feature. This method offers advanced control over video quality and resolution, making it suitable for professional presentations.
Step 1 – Download: Go to File > Download as > Microsoft PowerPoint (.pptx) .
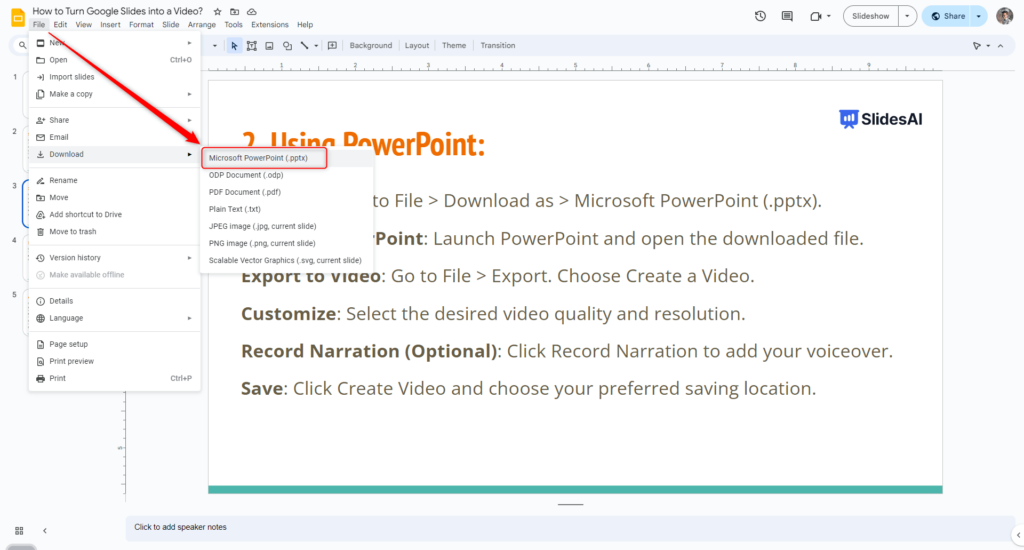
Step 2 – Open in PowerPoint: Launch PowerPoint and open the downloaded file.
Step 3 – Export to Video: Go to File > Export . Choose Create a Video .
Step 4 – Customize: Select the desired video quality and resolution .
Step 5 – Record Narration (Optional): Click Record Narration to add your voiceover.
Step 6 – Save: Click Create Video and choose your preferred saving location.
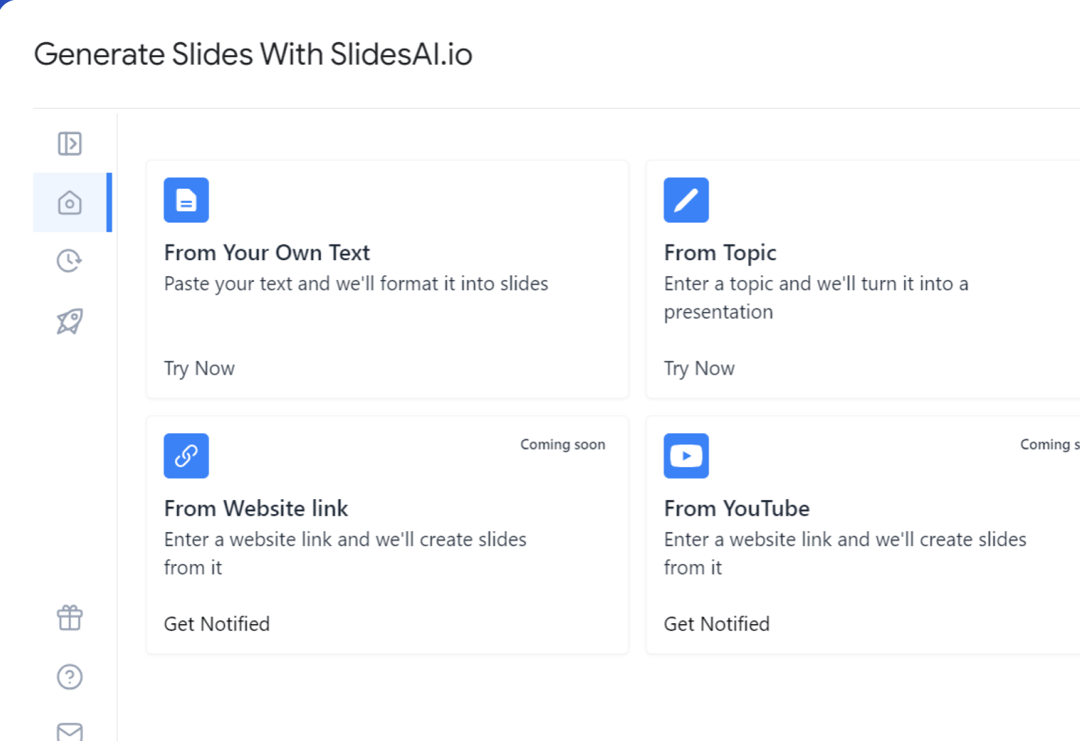
Create presentation slides with AI in Seconds in Google Slides
14M+ Installs
Works with Google Slides
3. Using Canva
Canva, a popular design platform, allows you to import your Google Slides presentation and convert it into a video. With its user-friendly interface and pre-designed templates, Canva is a great option for creating visually appealing video presentations without extensive editing skills. To convert your slides using Canva follow these steps:
Step 1 – Import Slides: Go to Canva and click Create a Design . Choose Presentations and select Import from Google Slides .
Step 2 – Edit (Optional): Make any desired edits using Canva’s editing tools.
Step 3 – Convert to Video: Click the Share button and choose Download as MP4 .
4. Using a Recording App
For a quick and straightforward solution, consider using a screen recording app. While this method doesn’t offer the same level of customization as the other options, it can be effective for basic presentations where narrating your slides is sufficient. Have a look at the steps below to see how it’s done:
Step 1 – Choose an App: Select a screen recording app like Loom or Screencastify.
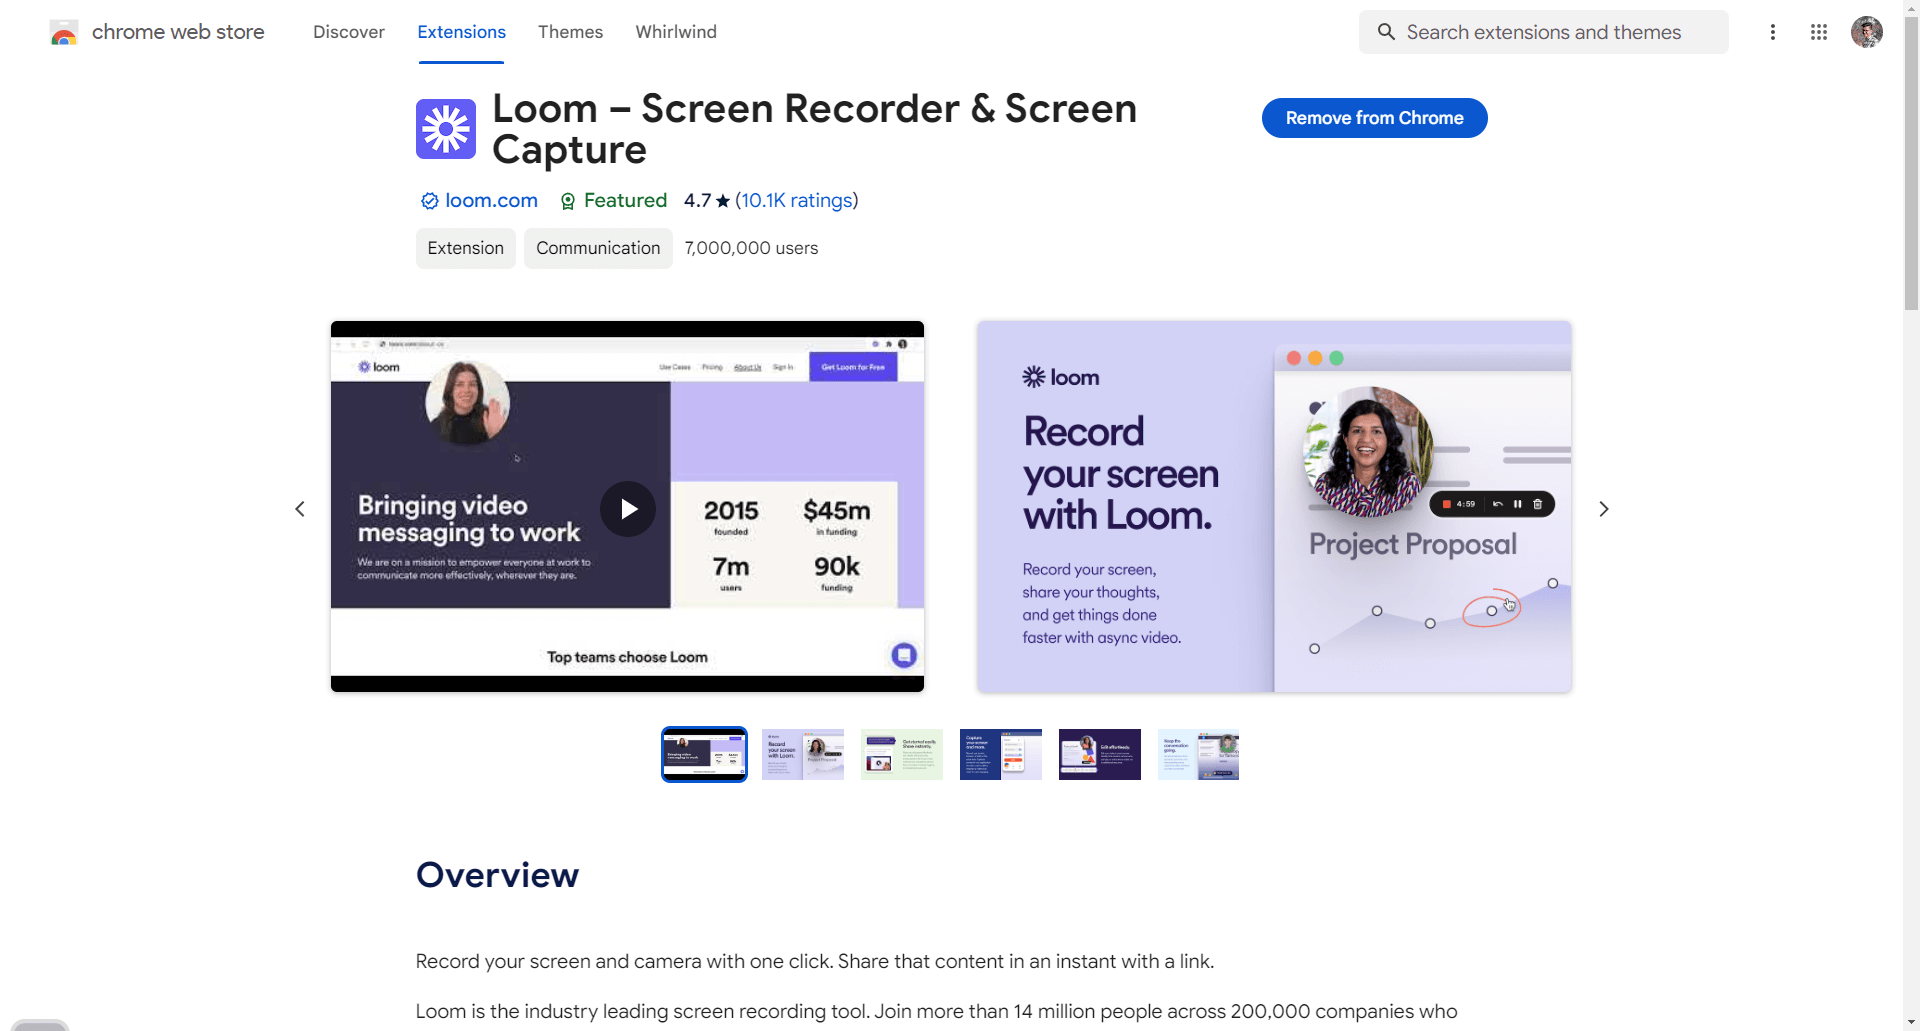
Step 2 – Set Up Recording: Choose the recording area (entire screen or specific window).
Step 3 – Record: Start recording your presentation while narrating or adding annotations (if the app allows).
Step 4 – Stop Recording: End the recording and edit the video (optional) using the app’s features.
Step 5 – Save: Download the final video in your preferred format.
What are the Benefits of Converting Google Slides into a Video?
1. easy to watch and share.
When making presentations, people often use formats that anyone can easily see. Videos are one such format because they work on phones, TVs, computers, and tablets. This makes them accessible even for those who aren’t familiar with Google Slides. People can share videos on platforms like YouTube, TikTok, Facebook, or others without needing special software.
Plus, videos don’t need any special programs to watch or share files. Unlike Google Slides, which needs a Google account to see and send files.
2. Engaging Content Everywhere
Videos work well on different platforms, reaching a wide audience. They get lots of likes and comments on social media. You can also put videos on websites for tutorials and demos, making your site more exciting and keeping people’s attention longer.
If you add a video to emails, people are more likely to click and watch. It’s a way to keep people interested using modern techniques like email marketing.
3. Better Storytelling
In business, presentations can be really important. Sometimes Google Slides might not be enough to explain ideas to investors. Using videos can make storytelling better by mixing text with pictures and effects. Adding voiceovers and narrations can make presentations more personal.
Videos can create strong emotional connections with music and animations. When explaining hard stuff, videos can make it easier for people to understand ideas.
4. Easy Offline Viewing
Change Google Slides into a video and get a file with all the pictures and stuff. You can save this file on your device or share it with others. Unlike Google Slides, you don’t need the internet to see the file. You can download videos and watch them later, even if you’re not online. Also, you can record conferences to remember what was said later.
- No design skills required
- 3 presentations/month free
- Don’t need to learn a new software

Frequently Asked Questions
1. how do i convert google slides to powerpoint.
You can change your Google Slides into PowerPoint. Just download your Google Slides file as a PowerPoint file. To do this, go to the top bar, click on “File,” and then select “Download.”
2. How to Convert Google Slides to PowerPoint with Audio?
Unfortunately, you can’t directly convert Google Slides to PowerPoint with audio. You’ll need to export the Slides as a PPT file. After downloading it, open the file in Microsoft PowerPoint and then add the audio manually.
3. Will my slide animations work in the video?
Sometimes, depending on the method you choose.
4. How long does it take to convert Google Slides to video?
It depends on the length of your presentation and the tool you use.
Related Posts
How to Add or Embed a Video into Google Slides?
“Attention, please!” – this is what your presentations will shout, not you. No more yawning audiences or glazed-over eyes as your slide deck unfolds. Imagine transforming your presentations into captivating visual journeys!

How to Fix Unable to Play Video Error 150 in Google Slides
Facing an error, especially when you’re in a rush to deliver a presentation using Google Slides, can be tough. One common issue is ‘Error 150’, which pops up as ‘Unable to play video: Error 150’ when you try to play a video. It’s more than just a notification; it interrupts your presentation flow. To help overcome this obstacle, let’s explore some troubleshooting steps and tips to resolve the issue and ensure a smoother presentation experience.

How To Make Google Slides Vertical: A Step-By-Step Guide
Traditional landscape mode slides are well-suited for laptop or desktop viewing, but they fall short in terms of mobile convenience, limiting the implementation of certain graphics and charts at times. In such cases, you need a vertical aspect ratio. So, how to make a Google slide vertical? This short tutorial will show you the steps […]
Save Time and Effortlessly Create Presentations with SlidesAI

- Google Slides Tutorials
How to Turn Google Slides into a Video Easily
Google Slides is an amazing tool for creating presentations. But what if you could turn those slides into a video? Videos can be more engaging and are perfect for sharing online, whether it’s for a business project, school assignment, or social media content. In this blog post, we’ll walk you through the simple steps to convert your Google Slides into a captivating video.
Why Convert Google Slides to a Video?
Turning your slides into a video can make your content more versatile. For instance:
- Engage your audience better: Videos are easier to follow and more dynamic than static slides.
- Share easily: Platforms like YouTube or social media are perfect for video content.
- Add a professional touch: A video with transitions, animations, and narration feels polished.
Now, let’s explore how to make the magic happen.
Step-by-Step Guide to Convert Google Slides to a Video
Step 1: prepare your google slides presentation.
Before anything else, polish your presentation.
- Add animations and transitions to make it more lively.
- Include relevant images, videos, and charts to enhance the message.
Step 2: Export Slides as Images (Optional)
If your slides are simple and don’t need animations, exporting them as images can work.
- Go to “File” > “Download” > “JPEG” or “PNG.”
- Save all slides to your computer.
This method is best when you want to use another video editor to create a custom video.
Step 3: Use Google Slides’ Built-in Feature
Google Slides doesn’t have a direct “export as video” option, but you can still get the job done.
- Click on “File” > “Download” > “Microsoft PowerPoint (.pptx)”.
- Open the file in PowerPoint.
- Use PowerPoint’s video export option to save it as a video.
- Go to “File” > “Export” > “Create a Video” and choose your quality settings.
Step 4: Record Your Presentation
Don’t want to use PowerPoint? No problem. You can record your presentation directly:
- Open your Google Slides and present it in “Slideshow Mode.”
- Use a screen recorder like OBS Studio, Loom, or Screencastify to capture your screen.
- Record yourself narrating while moving through the slides.
- Save the recording as a video file (MP4 is best for compatibility).
Step 5: Add Music or Voiceover (Optional)
To make your video more engaging, you can:
- Add background music that fits the tone of your presentation.
- Add a voiceover to explain each slide for a more professional touch.
If you’re new to creating presentations and want to make yours look stunning, check out free Google Slides templates for inspiration.
Pro Tip: Save Your Work in Multiple Formats
You can also save a copy of your slides as a PDF for easy sharing. Need help? Here’s a great guide on how to convert Google Slides into PDF . This ensures you have everything you need, no matter what format your audience prefers.
Wrapping It Up
Converting Google Slides into a video is super easy, even if you’re not a tech expert. Whether you’re preparing a school project, a business pitch, or simply a creative presentation, this process will add an edge to your content. So, give it a try today, and wow your audience with your new skills!
Spread Love
Related blogs.
Arockia Mary Amutha
Arockia Mary Amutha is a seasoned senior content writer at SlideEgg, bringing over four years of dedicated experience to the field. Her expertise in presentation tools like PowerPoint, Google Slides, and Canva shines through in her clear, concise, and professional writing style. With a passion for crafting engaging and insightful content, she specializes in creating detailed how-to guides, tutorials, and tips on presentation design that resonate with and empower readers.
Recent Blogs

How to Create an Effective Lesson Plan Presentation?
A significant first step towards creating a great lesson plan presentation is vital to any teacher who wants his lesson...

How to Easily Add Captions to Images in Google Slides
Adding captions to images in Google Slides can greatly enhance your presentations by providing context and ensuring your audience gets...
How to Conduct a SWOT Analysis: Guide For Growth and Success
Introduction: A successful business starts with a clear understanding of its strengths, weaknesses, opportunities, and threats. But what about your...
SIGNUP FOR NEWSLETTER

How to Convert Google Slides to Video [For FREE]
By: Author Shrot Katewa
![save google presentation as video How to Convert Google Slides to Video [For FREE]](https://artofpresentations.com/wp-content/uploads/2021/04/Featured-Image-how-to-convert-Google-Slides-to-video.jpg)
Although Google Slides is completely free to use, it does come with its own disadvantages! For instance, if you want to convert your Google Slides presentation to a video, you will not be able to do it out-of-the-box, and you will need to other methods.
Currently, there is no direct method available to convert a Google Slides presentation into a video. However, you can convert Google Slides to a video using third-party applications such as PowerPoint, Screencastify, or even default screen recording applications.
In this article, I’m going to share with you 3 different methods (all FREE) to convert your Google Slides presentation into a video.
So, let’s get started!
Method 1 – Export Google Slides to Video using PowerPoint
Google Slides does not have the option to directly convert presentatations into videos. However, there are a few easy ways to get the job done. One of such ways is to do it using Microsoft PowerPoint. This might sound a little difficult, but once I show you how it’s done, you will have the confidence to do it on your own. All you need to do is to follow these easy steps one by one:
Step-1: Download your Google Slides Presentation on your Computer
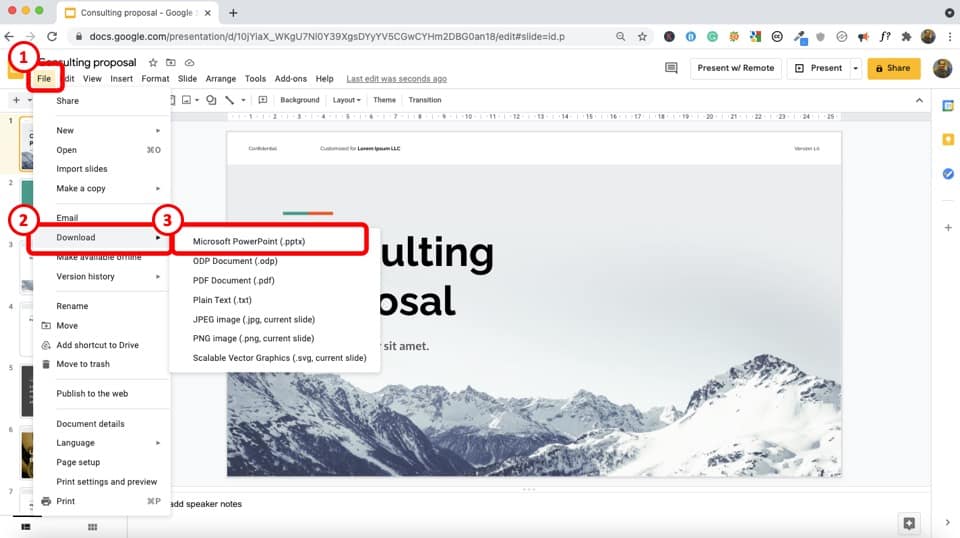
Open your Google Slides Presentation and click on ‘File’. From the dropdown menu, place your cursor on ‘Download’ and select ‘Microsoft PowerPoint (.pptx).’ The presentation will be downloaded to your computer as a Pptx file.
Step-2: Open Microsoft PowerPoint and Access the Screen Recording Option
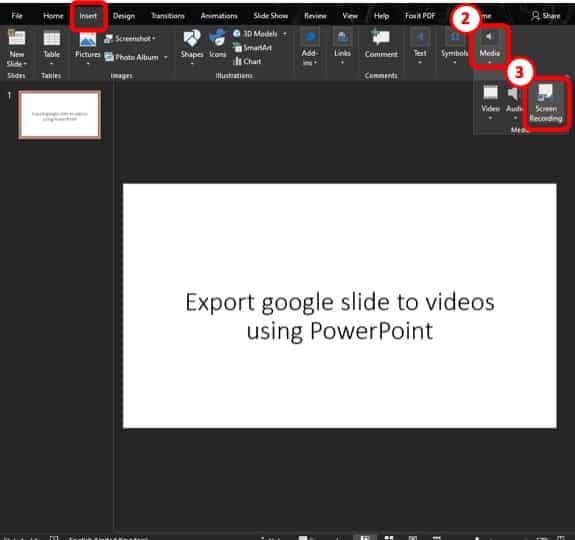
Open the file you have just downloaded with Microsoft PowerPoint and click on the ‘Insert’ tab. After that, slide towards the ‘Media’ button to add Screen Recording in your presentation.
Step-3: Record your Presentation

A recording panel will pop up once you click on ‘Screen Recording’. But, do not start recording yet. Select the portion of the screen you want to record.
Then, go back to the slides and initiate your Presentation. Once the presentation starts press the recording button immediately. Similarly, click on the stop button after your presentation is over.
Step-4: Export your Presentation to Video
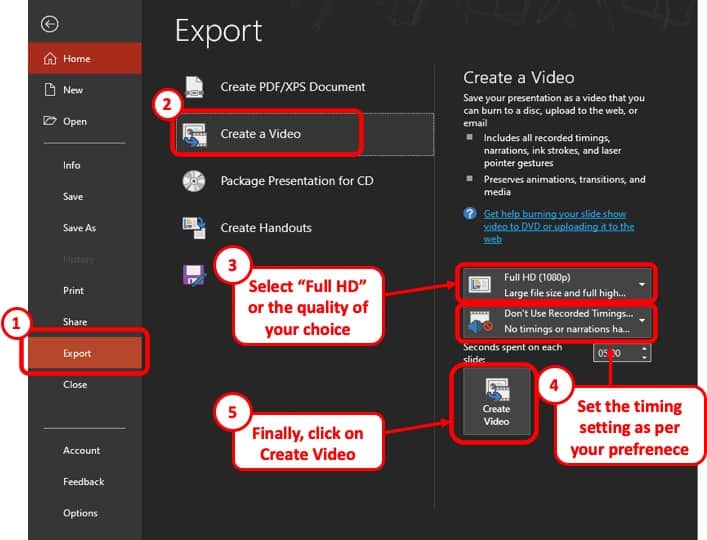
Go to the ‘file’ tab and click on ‘Export’. Upon clicking, you will be given five options where you have to choose ‘Create a video.’ On the right panel, select the quality of the video you want (Example: Full HD 1080p) and specify the timing. After that, click on the ‘Create Video’ button.
Step-5: Save the Video file to your desired directory
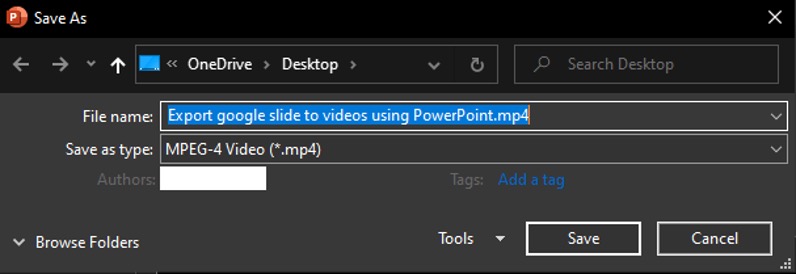
You will be asked to assign a name to your video and select where you want it to be saved. Click on ‘Save’ and its done!
Method 2 – Convert Google Slides to Video using Free Online Tools
Since Google Slides do not offer an option to export presentation slides to video, you can get the job done using any of the online tools available out there. Here, I will be highlighting two of the most popular ones: Screencastify and Slidevid. Follow the steps below to learn how to use these tools effectively:
2.1 Using Screencastify
Screencastify is a Chrome extension that allows users to screen record, edit and share videos. This is a very handy tool when it comes to converting Google slides to video. You can it by simply installing the Screencastify extension to your browser (For Google Chrome, you’ll find it on Chrome Webstore).
Step-1: Download, Install and Open Screencastify
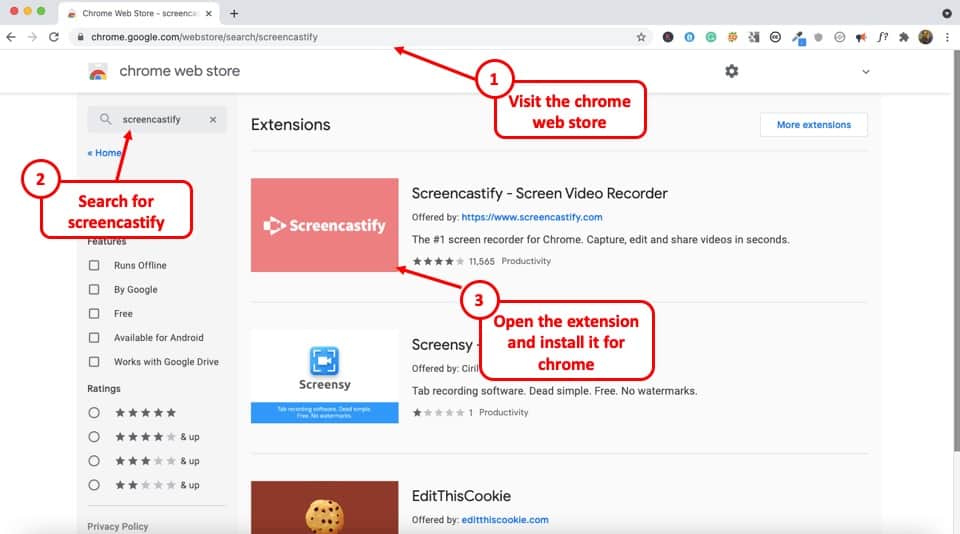
Visit the Chrome Web Store . Then, search for “Screencastify” by entering it in the search box in the top left corner of the screen. Click on Screencastify extension and install it.
Once installed, you will find the extension icon on the top right corner of your screen on the bookmark tab (or on the address bar tab depending on the setting of your browser). Go for the Screencastify icon and click on it.
Step-2: Start Recording using Screencastify
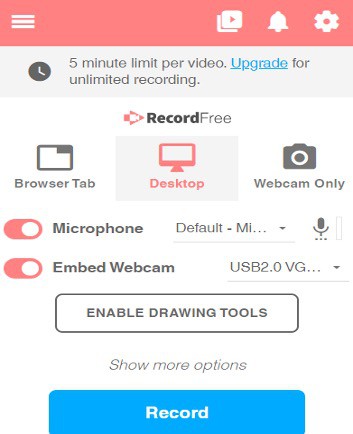
A recording panel will appear under the Screencastify icon where you will be given the option to choose from Browser tab, Desktop and Webcam.
Click on the ‘Browser Tab’ to record the Google Slides Presentation on your browser. Make sure the Microphone option is turned on if you want to add audio to your presentation. Press ‘Record’ to start recording.
Step-3: Adding a Title and Editing the Video
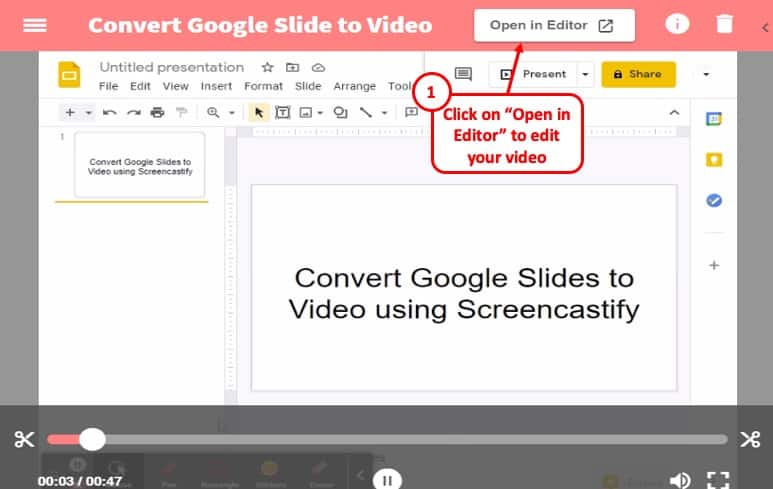
When you are done recording, Screencastify will take you to a new browser tab where you can trim your recordings and add a title on top. Next to the title, there is an ‘Open in Editor’ button. Clicking on it will take you to another tab to make the necessary changes to your video.
Step-4: Edit, Export to MP4, and download the Video
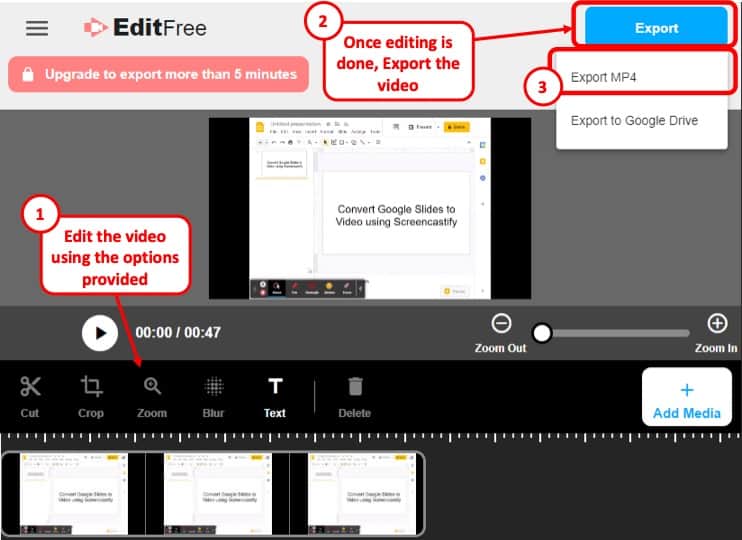
In this tab, you will have the option to add multiple recordings, texts, audio to your video. You can also crop, zoom, or blur your video if you want. When you are done, click on the ‘Export’ button and select ‘Export MP4’ to download the video on your computer.
2.2 Using SlideVid
SlideVid is a tool you can add on Google Slides and use it to make a video of your presentation. Follow the steps below to master its use:
Step-1: Finding the ‘Add-on’ option in Google Slides
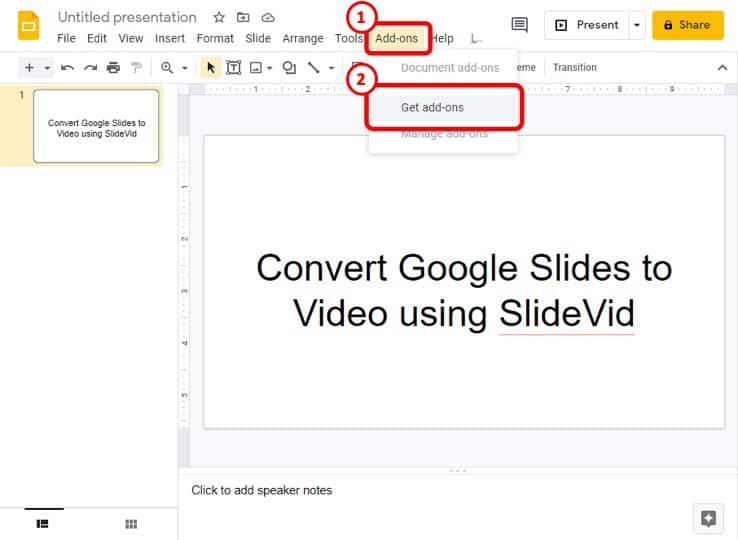
On your Google Slides presentation, you will find the ‘Add-ons’ tab at the top right. Click on it and from the dropdown menu, click on ‘Get add-ons’.
Step-2: Search for SlideVid and Install it
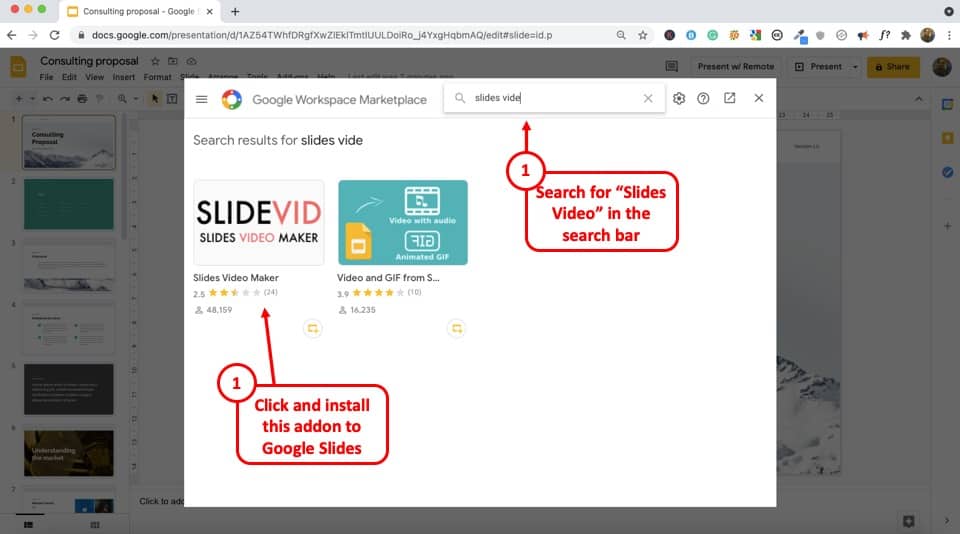
This will open a tab on your screen where you will find many add-ons to choose from. Search for ‘SlideVid’ from the list and install it.
Simply click on “Install”, then click “Continue”. Do provide the necessary credentials to sign-in to your Google account.
Step-3: Open SlideVid
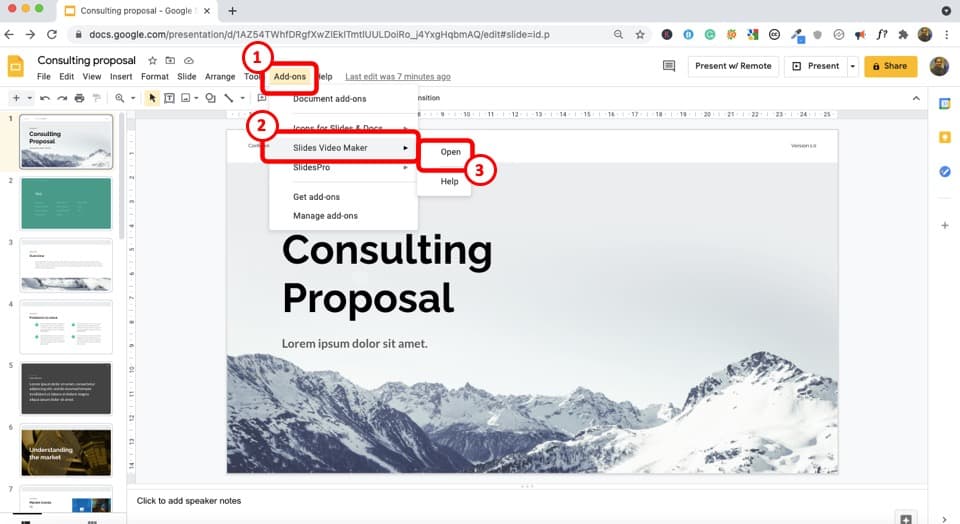
Go back to your Google Slides presenation and place your curson on the ‘Add-ons’ tab. From the dropdown menu, click on ‘Slide Video Maker’ and select ‘Open.’
Step-4: Create your video and download it.
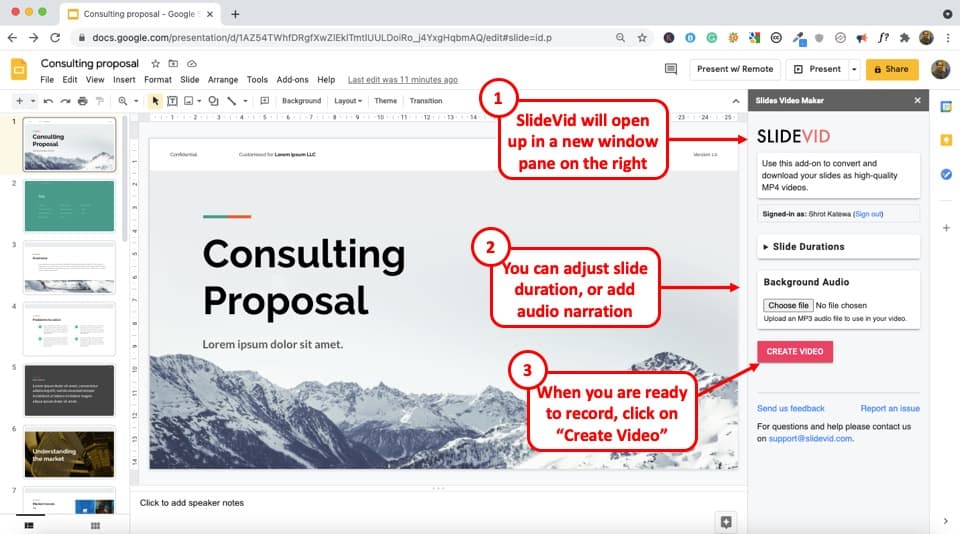
A bar will appear on the right side of your screen where you can choose the duration for every individual slide on your video. You can also upload any background audio you want. Click on the ‘Create Video’ button and your presentation slides will be processed and converted to a video.
On completion, it will be sent to your email address and you can easily download it in MP4 format.
Method 3 – Save Google Slides as Video using Screen Record Software
Screen recording applications allow users to record on-screen slides and present them through a video. Depending on the computer you are using and its operating system, the default screen recording software may vary. In this section, I’ll be giving you a step-by-step guide on how to do it with both Mac and Windows.
3.1 For Windows
Screen recording on Windows is quite easy, and you can do it using the Xbox Game Bar application. Follow the steps below:
Step-1: Open Xbox Game Bar application
From your computer’s start menu, find the Xbox Game Bar application and open it. This will open up a bar on your screen. Click on the monitor-shaped icon which allows you to take a screenshot, record screen and audio.
Step-2: Open the Google Slides Presentaion on your browser and start recording
Go to your Google slide tab to record your screen while presenting it. Your screen will start recording when you simply click on the round recording button from the ‘capture’ option. After you are done, click on the stop button to end the recording.
Step-3: Watch preview and select where you want to save the video
The ‘Show all captures’ button on the Capture tab will allow you to preview your captures and recordings. Upon clicking on the ‘Open file location’ option, you will be taken to the directory where your video is saved in MP4 format.
3.2 Quicktime Player for Mac
If you are using a Macbook or an Apple computer, I strongly recommened you to use Quicktime player. Not only is it easy to use as a screenrecorder, but it also allows you to edit your video just the way you want. Follow the steps below:
Step-1: Open Quicktime Player and Access the Recording Option
On your taskbar, look for the Quicktime Player an open it. Go to the ‘File’ tab next to the Quicktime Player title and from the dropdown menu, click on ‘New Screen Recording’ which will open a recording a panel on you screen. Don’t start recording right away.
Open your Google Slides presentation and bring back the screen recording panel. Once you have the presentation open on your screen, click on ‘Present’ to go full screen. Start recording the slides by clicking on ‘Record’ button from the screen recording panel.
Step-3: Stop Recording and Check the Preview
After you are done with your presentation, you can stop recording by simply clicking on the ‘Stop’ button from the screen recording panel. Quicktime player will then automatically show you a preview of your video, where you can edit it as well.
Step-4: Save or Export video
After you are done editing the video, you have to save the video to your desired directory. To do that, click on the ‘File’ tab and scroll down to the ‘Save’ or ‘Export’ option. Please note that choosing the ‘Export’ option will give also allow you to select the video quality.
How to Export Google Slides to Video with Audio
Almost all screen recording applications has the option to record or add audio to your presenation. Below, I’ll be dicussing how to enable audio recording in the applications I’ve discussed above:
Using Microsoft Powerpoint:
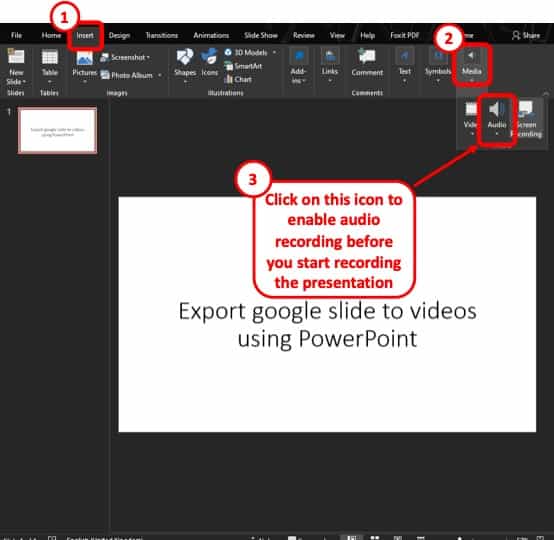
When the recording panel pops up, there is an audio icon that will allow you to record your audio alongside the video. If you want to enable audio recording, be sure to click on this icon before you start recording.
Using Screencastify:
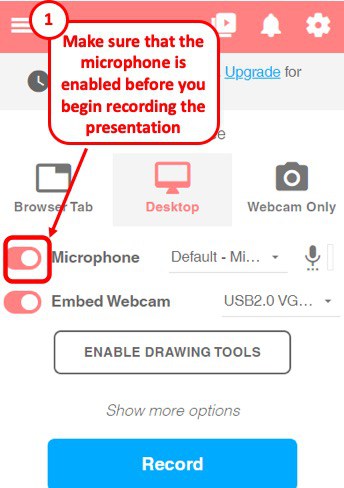
While selecting the browser tab for recording you Google Slides Presentation, make sure that the Microphone option is turned on, which will allow you to add audio to your screen recordings.
Using SlideVid:
Adding audio to SlideVid is a little different from the other applications. You have to prepare the audio beforehand and add it seperately to the video.
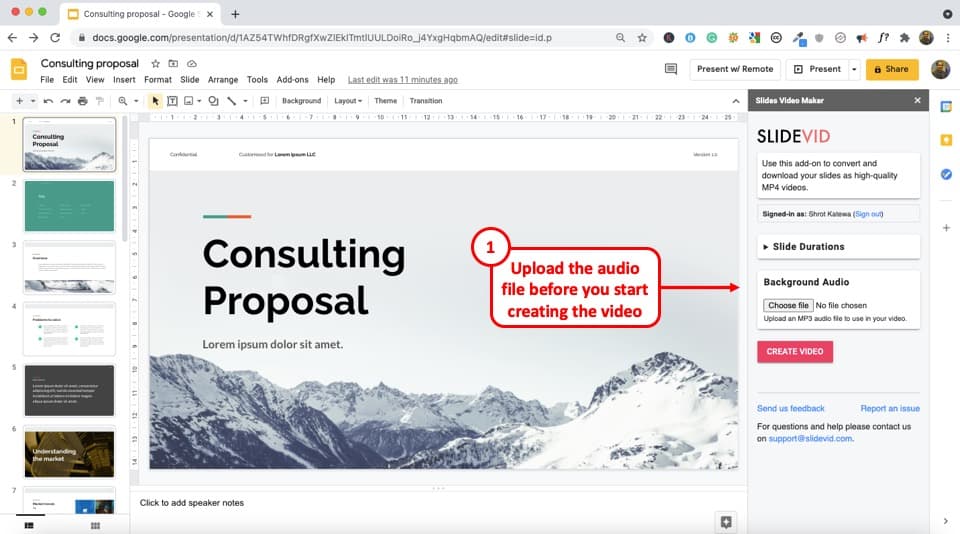
Once you have the audio prepared, you can simply add it to your presentation by clicking on ‘choose file’ from the ‘Background Audio’ section and selecting your audio file from its directory.
For Xbox Game Bar Application in Windows:
In the recording panel of the Windows Xbox Game Bar Application, you will find an audio button, right next to the screen recording button. Clicking on it will enable audio recording while recording the screen.
Quicktime Player in Mac:
In the screen recording panel of Quicktime Player, you will find a down arrow icon right next to the recording button. Click on it and select your default microphone system to enable audio recording.
How to Convert Google Slides to YouTube Videos?
As I’ve already mentioned, Google Slides does not have the option to record your presentation. Hence, if you want to convert a Google Slides presentation to a Youtube video, you’ll need to use a plug-in or an extension. I’ll show you how to do it using Screencastify.
Step-1: Open the Screencastify Application from your Browser’s Extension bar
From the extensions installed on your browser, click on the Screencastify icon to open it.
Step-2: Record your Presentation
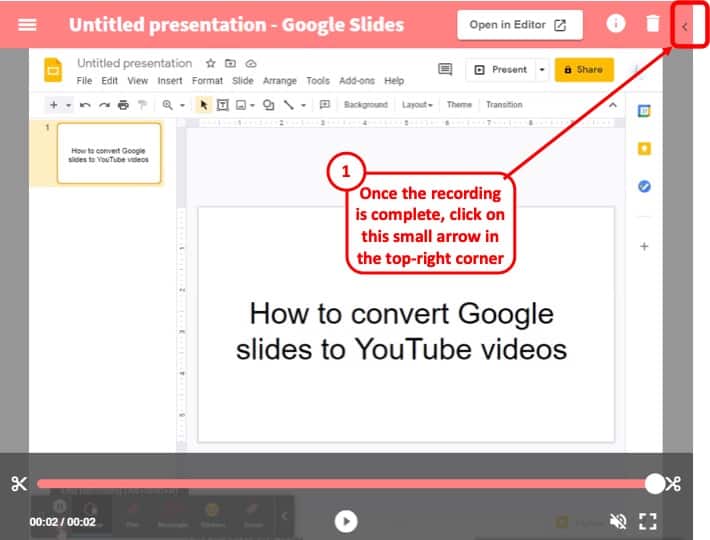
Record your Google Slides Presentation with Screencastify following the steps I’ve shown above. After you are done recording and editing your video, click on the arrow icon on the top right corner, next to the bin icon.
Step-3: Publish to YouTube
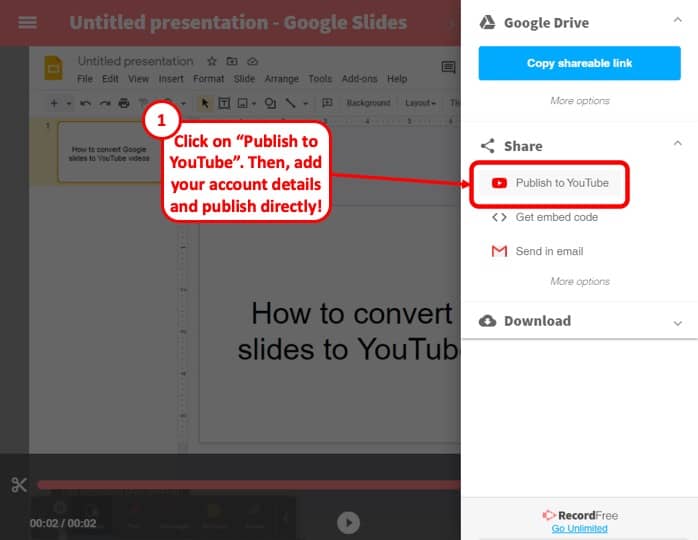
Clicking on the arrow icon will open a new panel on the right side of your screen, where you will find the ‘Share’ section. To upload your video on YouTube click on ‘Publish to Youtube’.
Step 4: Add Youtube channel to Screencastify and Upload the Video
In order to upload your video using Screencastify, you will need to add your YouTube channel. To do that, click on the ‘Add a Youtube Channel’ and sign in to your Google/Youtube account. Add a title and description to the video and select your mode of privacy. Finish off by clicking on the ‘Upload’ button.
More Related Topics
- How to Fix Almost Anything on Google Slides! [A Comprehensive Troubleshooting Guide]
- Do Presentation Clickers Work with Google Slides? [Interesting Read!]
- How to Curve Text in Google Slides? Always Use THIS Trick!
- How to Use the Eyedropper Tool in Google Slides? [Even When This Tool Doesn’t Exist!]
- 17 Pros and Cons of Google Slides! [Should You Even Use it?]
- How to Give a Presentation on Zoom? [Step-by-Step Guide!]
Credit to Wayhomestudio for the featured image of this article
How to Turn a Google Slides Presentation Into a Video

Video presentations are becoming increasingly popular as an effective way to communicate ideas and engage audiences. Compared to traditional slide presentations, video allows you to incorporate multimedia elements, custom animations, voiceovers and more to create a more dynamic and memorable viewing experience.
The problem is that Google Slides does not have built-in support for exporting presentations as videos. But with a few simple workarounds, you can easily convert your existing Google Slides presentations into professional video presentations to share online or present in-person.
In this comprehensive guide, you’ll learn several methods for turning a Google Slides deck into a polished video using either PowerPoint or third-party apps and browser extensions.
Benefits of Creating Video Presentations
Before we dive into the step-by-step instructions, let’s look at some of the key reasons why you should consider converting your slide presentations into video format:
- More engaging and dynamic – Video presentations incorporate audio, motion graphics, animations and visuals for enhanced viewer engagement.
- Accessible and shareable – Video can be easily shared online and accessed on any device by viewers across the globe.
- Customizable – You can customize video presentations by adding voiceovers, background music, logos and more.
- Memorable – Viewers retain more information from videos compared to static slides.
- Trackable – You can track video analytics to see number of views, average percentage viewed, etc.
Method 1: Export Google Slides to PowerPoint
The easiest way to convert Google Slides to video is by first exporting your presentation to PowerPoint, which lets you save the file as an .mp4 video. Here is the step-by-step process:
- Open your Google Slides presentation and go to File > Download > Microsoft PowerPoint (.pptx) .
- Save the PowerPoint file on your computer and open it.
- On the ribbon at the top, go to File > Export > Create a Video .
- Customize options like video quality, resolution and duration between slides.
- Select a location to save your exported video file.
The major benefit of using PowerPoint is it gives you additional options for customizing and enhancing your video presentation, like adding transitions between slides, embedding external videos, inserting animations, narrating slides and more.
Method 2: Use Third-Party Apps and Browser Extensions
If you don’t have access to PowerPoint, don’t worry — you can use free third-party apps and Chrome extensions to easily convert Google Slides to video:
A. Screencastify
Screencastify is a popular Chrome extension used by over 10 million users to record screen videos. Here is how to use it:
- Install Screencastify from the Chrome Web Store.
- Open your Google Slides presentation.
- Click on the Screencastify extension icon to launch the video recorder.
- Customize options like camera, microphone and screen area to record.
- Click on Record to start capturing your presentation. Make sure to speak through each slide as you present.
- Stop the recording when finished. The video will now be available in your Screencastify dashboard.
Screencastify also features a basic video editor to trim clips, arrange slides and text overlays before exporting your final presentation video.
B. Creator Studio
Creator Studio is a Google Slides add-on that lets you quickly export presentations as videos or GIFs without ever leaving your file. To use it:
- Install the Creator Studio extension from the Google Workspace Marketplace.
- Open your presentation and click Extensions > Creator Studio > Create Video .
- Choose options like slide duration, resolution and export format.
- Click on Go to convert the Google Slides into a video based on your settings.
The resulting video can then be downloaded to your computer or shared via Google Drive.
Tips for Creating Compelling Video Presentations
Once you’ve converted your Google Slides into a video, make sure to incorporate these best practices for creating polished and professional video presentations:
- Keep it short and impactful. Videos under 10 minutes have higher completion rates.
- Use concise text and bullet points instead of lengthy paragraphs.
- Add background music to set the tone and engage viewers.
- Use custom animations and transitions between slides.
- Include relevant b-roll video clips where appropriate.
- Narrate your presentation with crisp, clear audio.
- End with a strong call to action.
Share Your New Video Presentation
The final step is to share your freshly converted Google Slides video presentation with your intended target audience. You can easily distribute the video via:
- Video hosting platforms like YouTube and Vimeo
- Social media networks
- Email and messaging apps
- Corporate intranets and training portals
- In-person meetings and conferences
With the right conversion methods and optimization best practices, you can create memorable video presentations that captivate audiences and effectively communicate your ideas.
So give your static slides a fresh new life by converting them into engaging videos with the techniques covered in this guide. Let us know if you have any other tips or questions in the comments below!
About The Author
Vegaslide staff, related posts.

How to Change Bullet Color in Google Slides

How to Change Slide Layouts in Google Slides
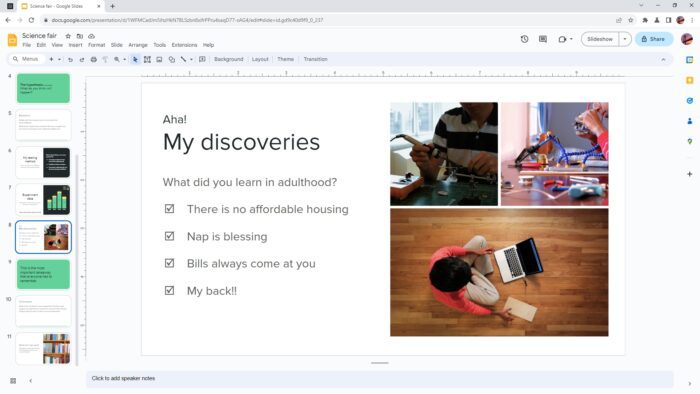
How to Insert Checkboxes in Google Slides

How to Add Videos and Customize Playback in Google Slides
Home Blog Google Slides Tutorials How To Convert a Google Slides Presentation to a Video
How To Convert a Google Slides Presentation to a Video
All our hard work in crafting compelling presentations can be reused in multiple ways. One of the methods is to publish the presentation in a video format via social media. This article will teach us how to convert a Google Slides presentation to a video format.
Before starting converting the slides to a video
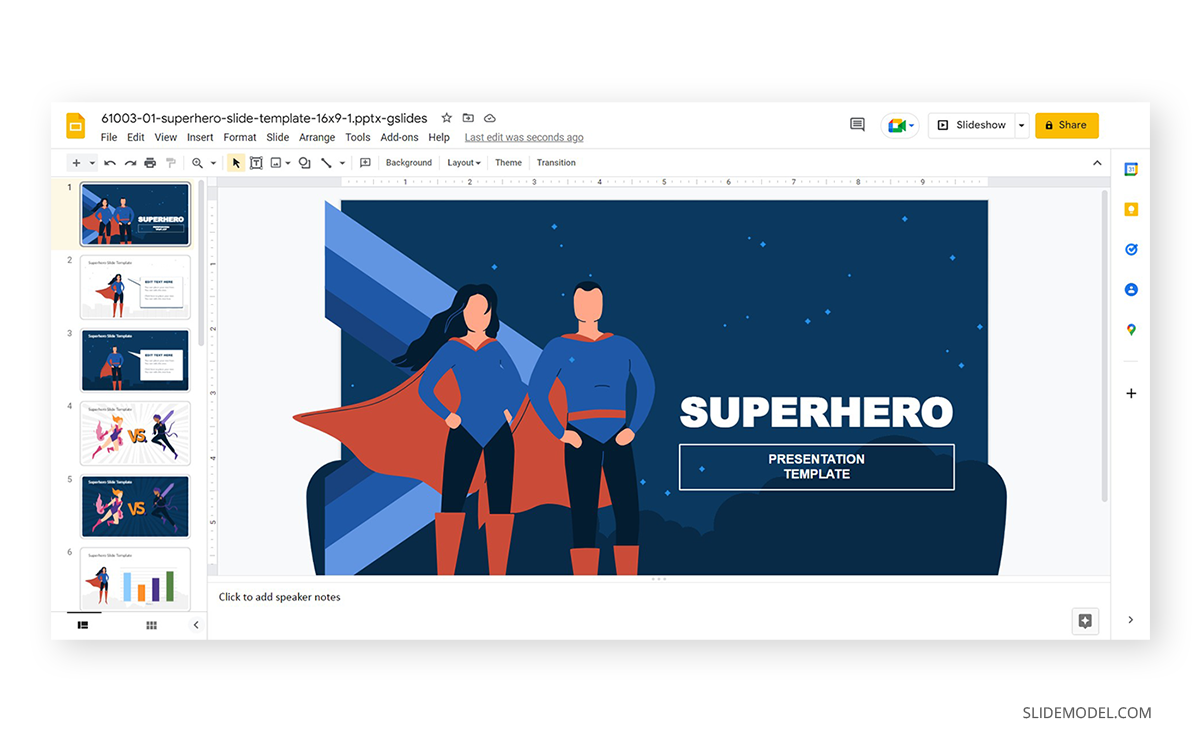
As the starting point of this tutorial, we will use the Superhero PowerPoint Template . Open the template in Google Slides format before going to the first step.
Once opened, the template should look like this.
Convert Google Slides to Video with Creator Studio Add-in
Accessing creator studio.
We will use an interesting add-on called Creator Studio. You can either work with a trial version or upgrade to a full license since it offers monthly and yearly plans.
Click the + icon on the right and Go to Get Add Ons. In the new window, search for “Creator Studio”
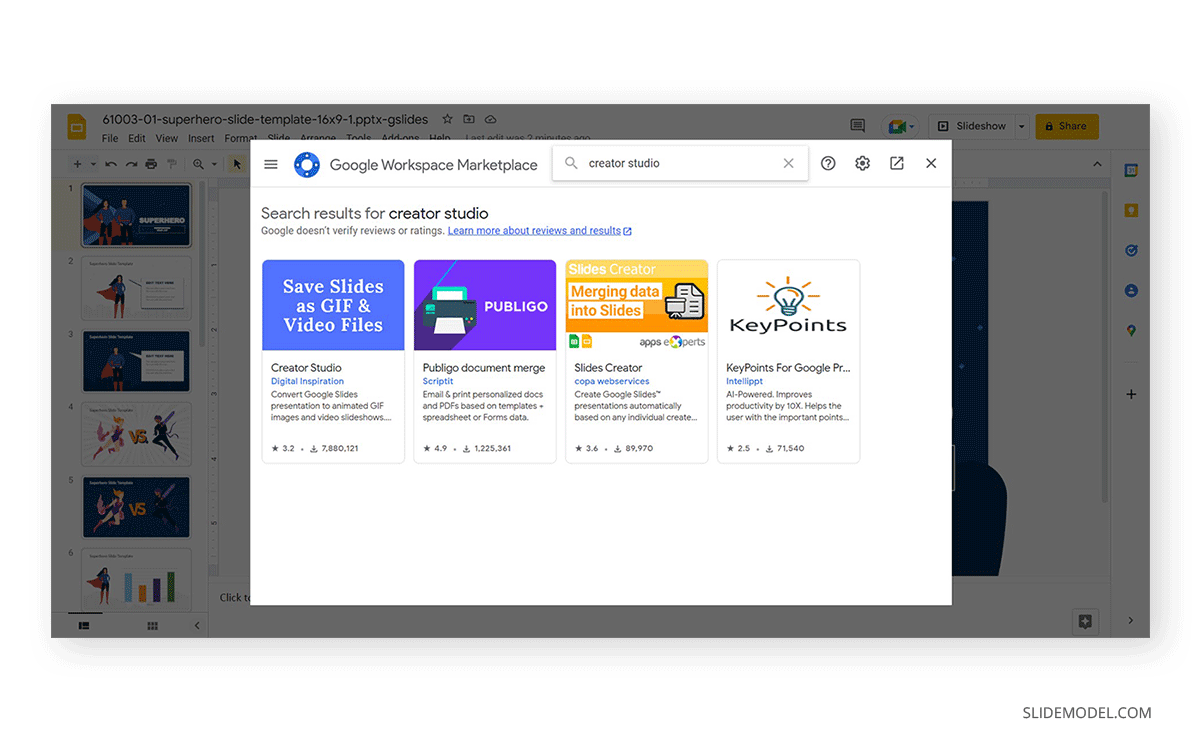
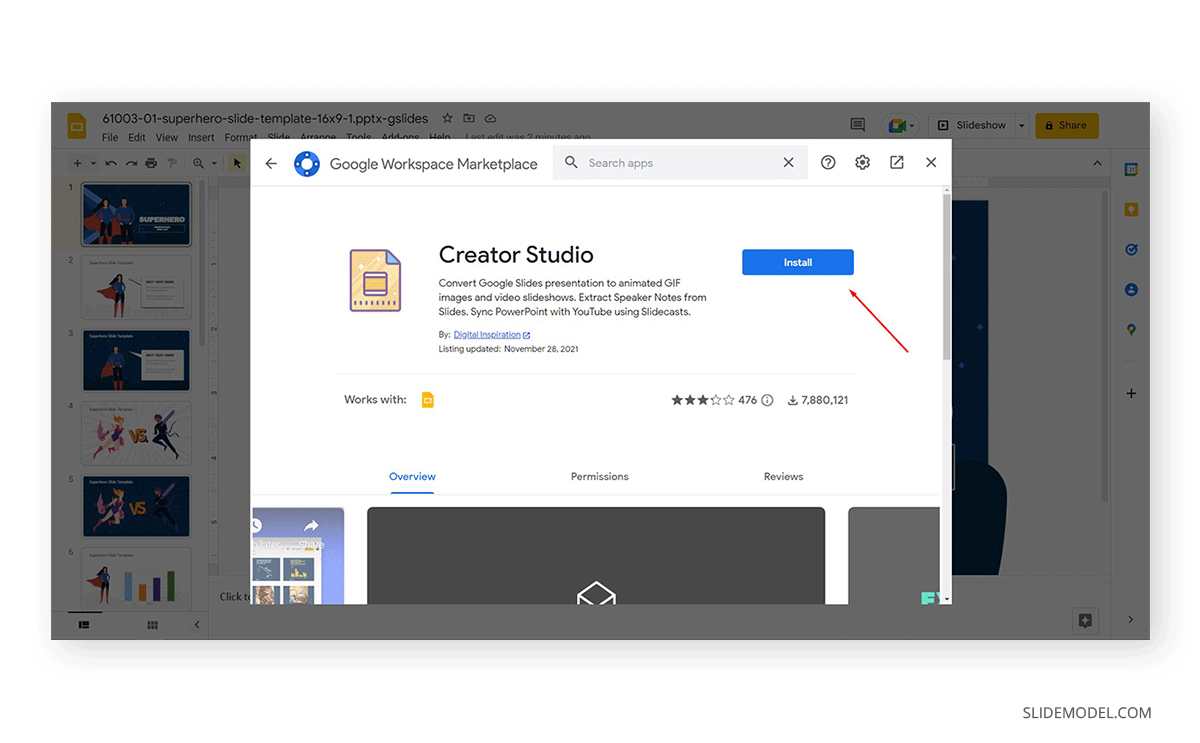
Click on the first icon, Creator Studio by Digital Inspiration. That’s the add-on we need to download. Then click on Install .
Recommended Reading: How to Add Video to Google Slides Presentation
Convert a Google Slides Presentation to a Video with Creator Studio
With all our tools ready, we go to Add-ons > Creator Studio . In there you can see plenty of options available.
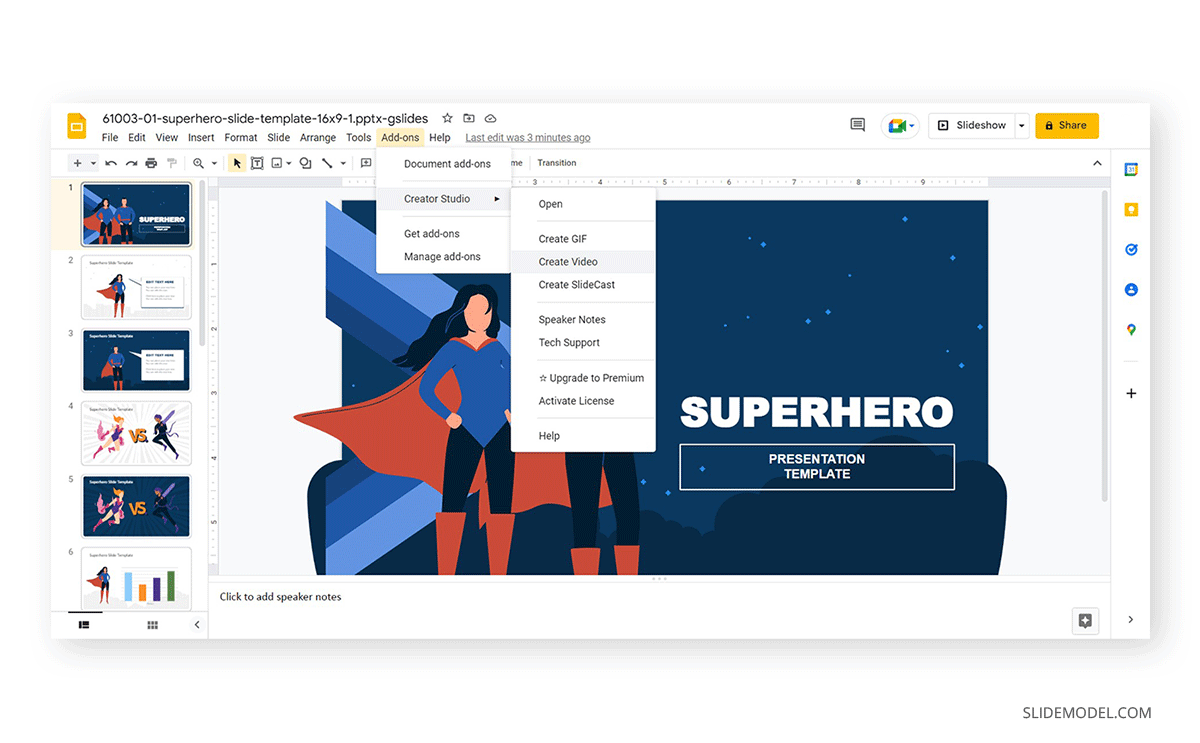
- Create a GIF is to create an animated image, compatible with most web browsers these days.
- Create a Video is the most popular option for this plugin and the one we will use.
- Create a SlideCast sync your presentation with your YouTube account to directly stream it over there. You can even add timestamps if required.
Click on Create a Video . A new panel should open over the right side after the “Working” message completes its cycle.
First, add the desired width for the video (by default, 300px), then the time that will go in between slides (interval in seconds).
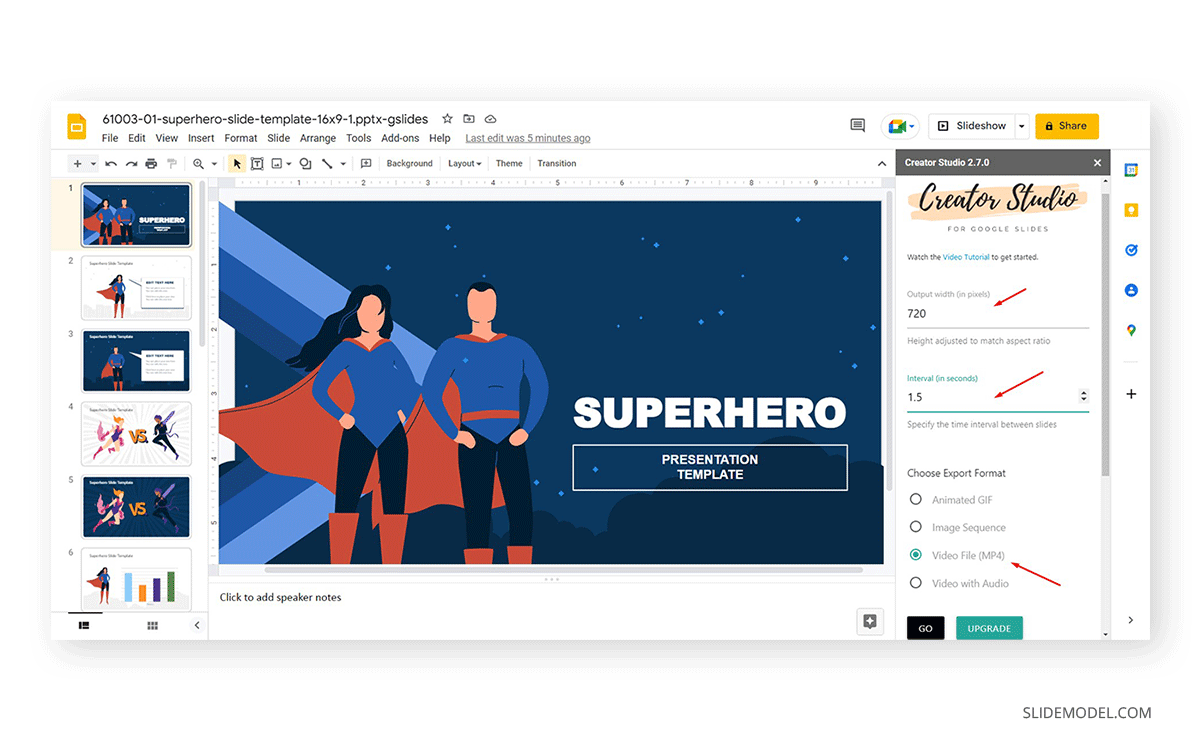
The Export Format should be Video File (MP4). Click on Go to start the conversion process. The end result is as shown below.
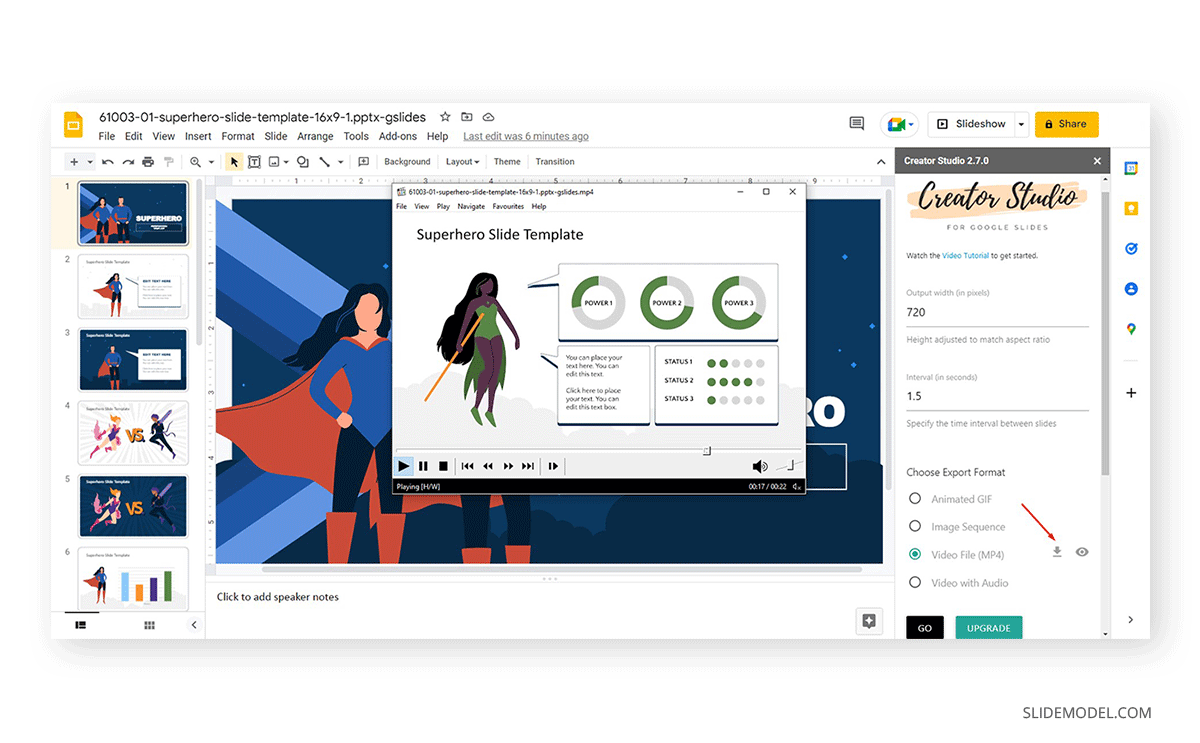
Download your video by clicking on the arrow close to Video File (MP4). You can test the video on any player.
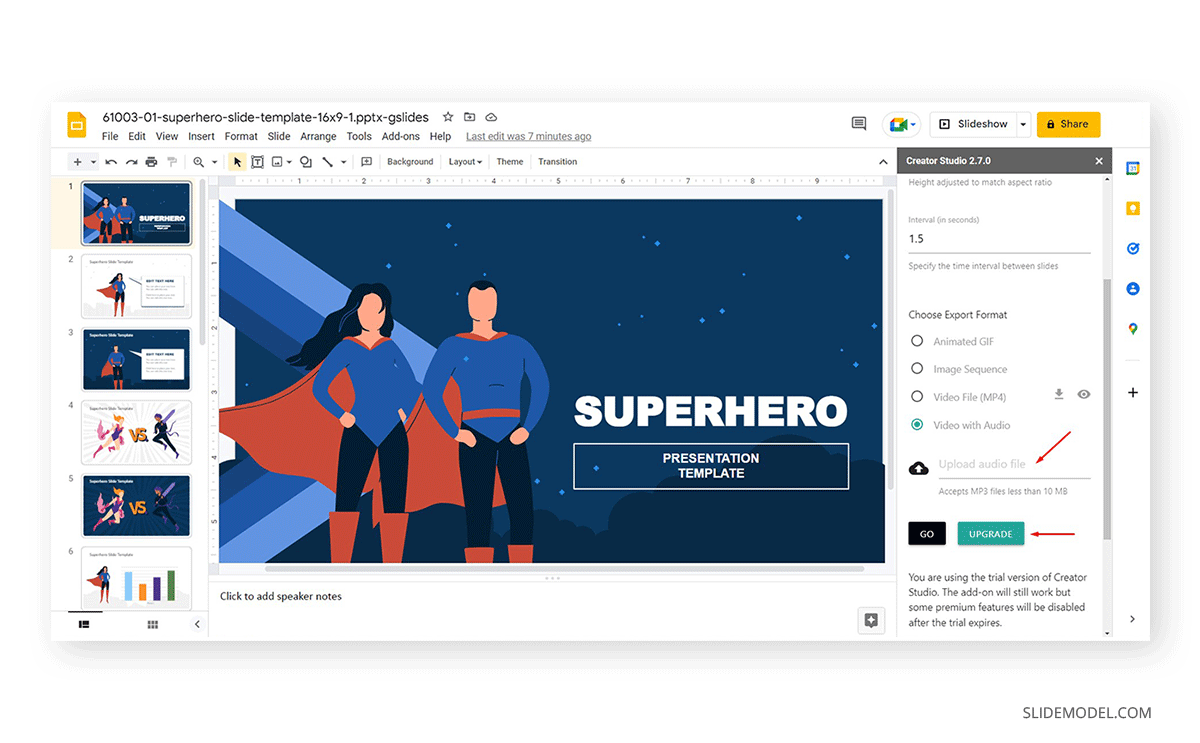
Last but not least, there’s another option worth to explore: Video with Audio . This allows us to upload an MP3 file for the video, either that being an audio recording explaining the slides or just ambiance music for the presentation.
Convert Google Slides to Video using Recording App
Google Slides presentations can also be converted to video using screencasting apps to record your screen. This will also provide you with additional options to add voice-over narrations and record your cam to make the presentation more engaging by adding a face for the presenter. Furthermore, this method can also help convert your Google Slides presentations to video tutorials and informative video presentations that can be uploaded online for a wider audience.
There are a number of screen recording apps that you can use to record your Google Slides presentation. Some examples include BB Flashback Studio (Windows), QuickTime Player (Mac), Camtasia Studio (Windows and Mac), etc. For the purpose of this post, we are using ScreenPal , which is a video recording app that can be launched directly from an Internet browser. “You could also use a tool like Screen Recorder , which is also created by the ScreenPal team.
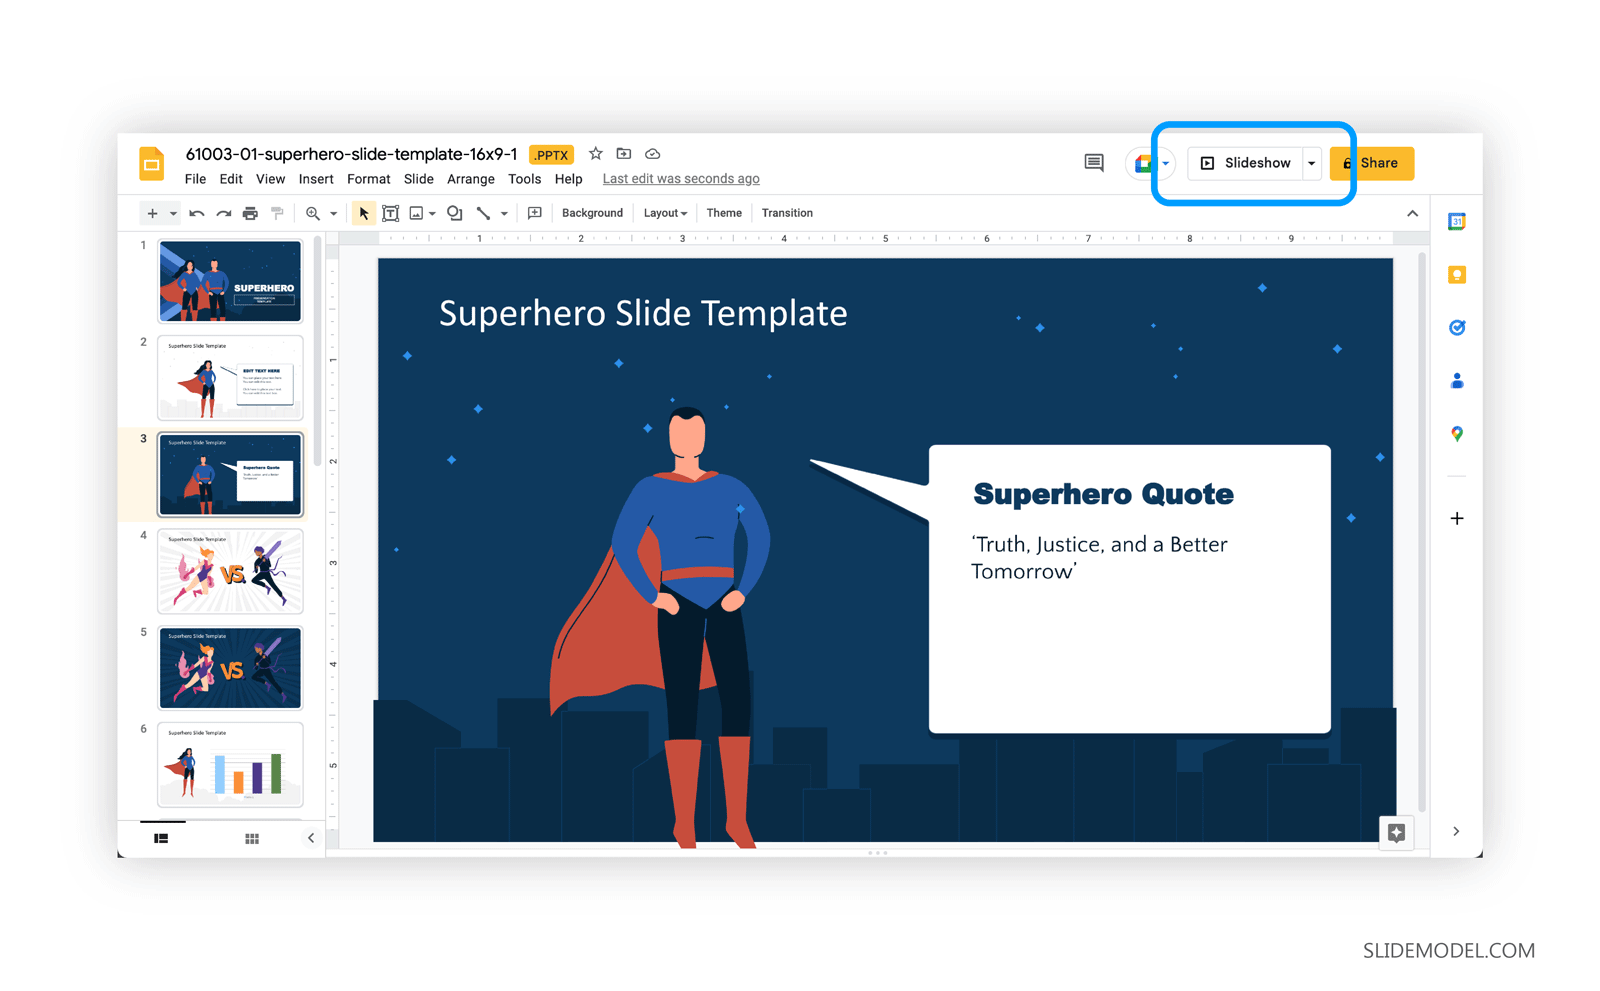
Step 1 – Launch Presentation in Slideshow Mode
While you can also record your slides without running a slideshow, it is recommended to run your slides in Slideshow mode to make the best use of the onscreen area. This can help you ensure that slide elements don’t end up appearing too small on screen.
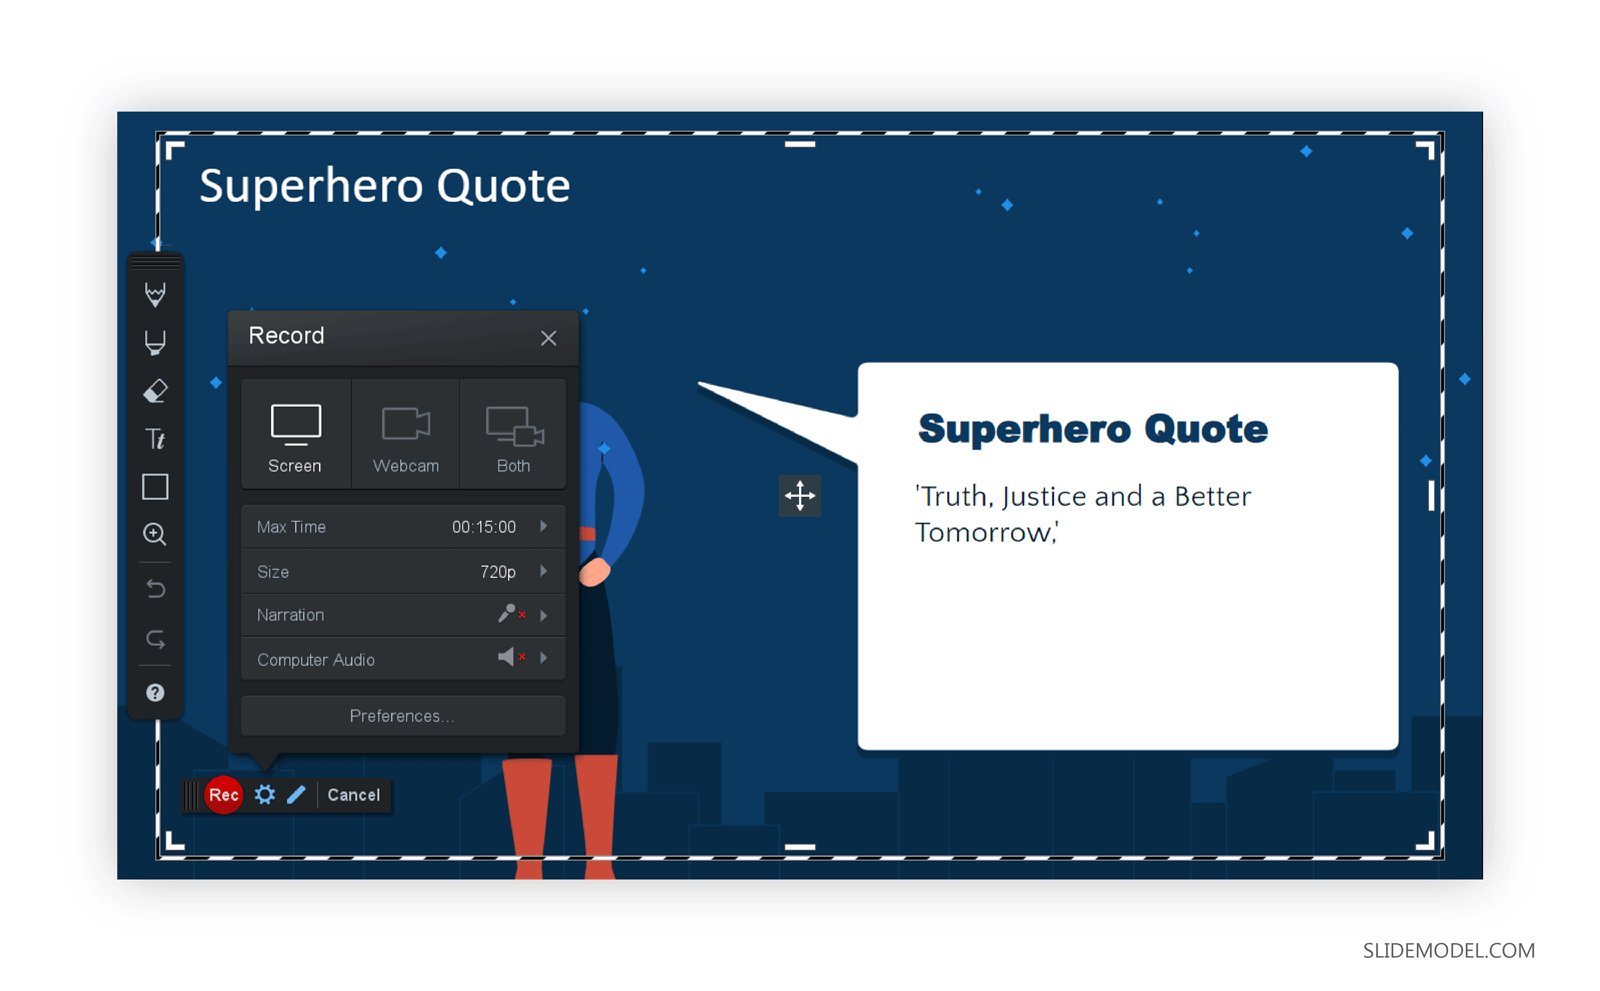
Step 2 – Launch Screen Recording App
Most screen recording apps have similar options. Once installed, they provide a few basic options to help the user customize recording settings.
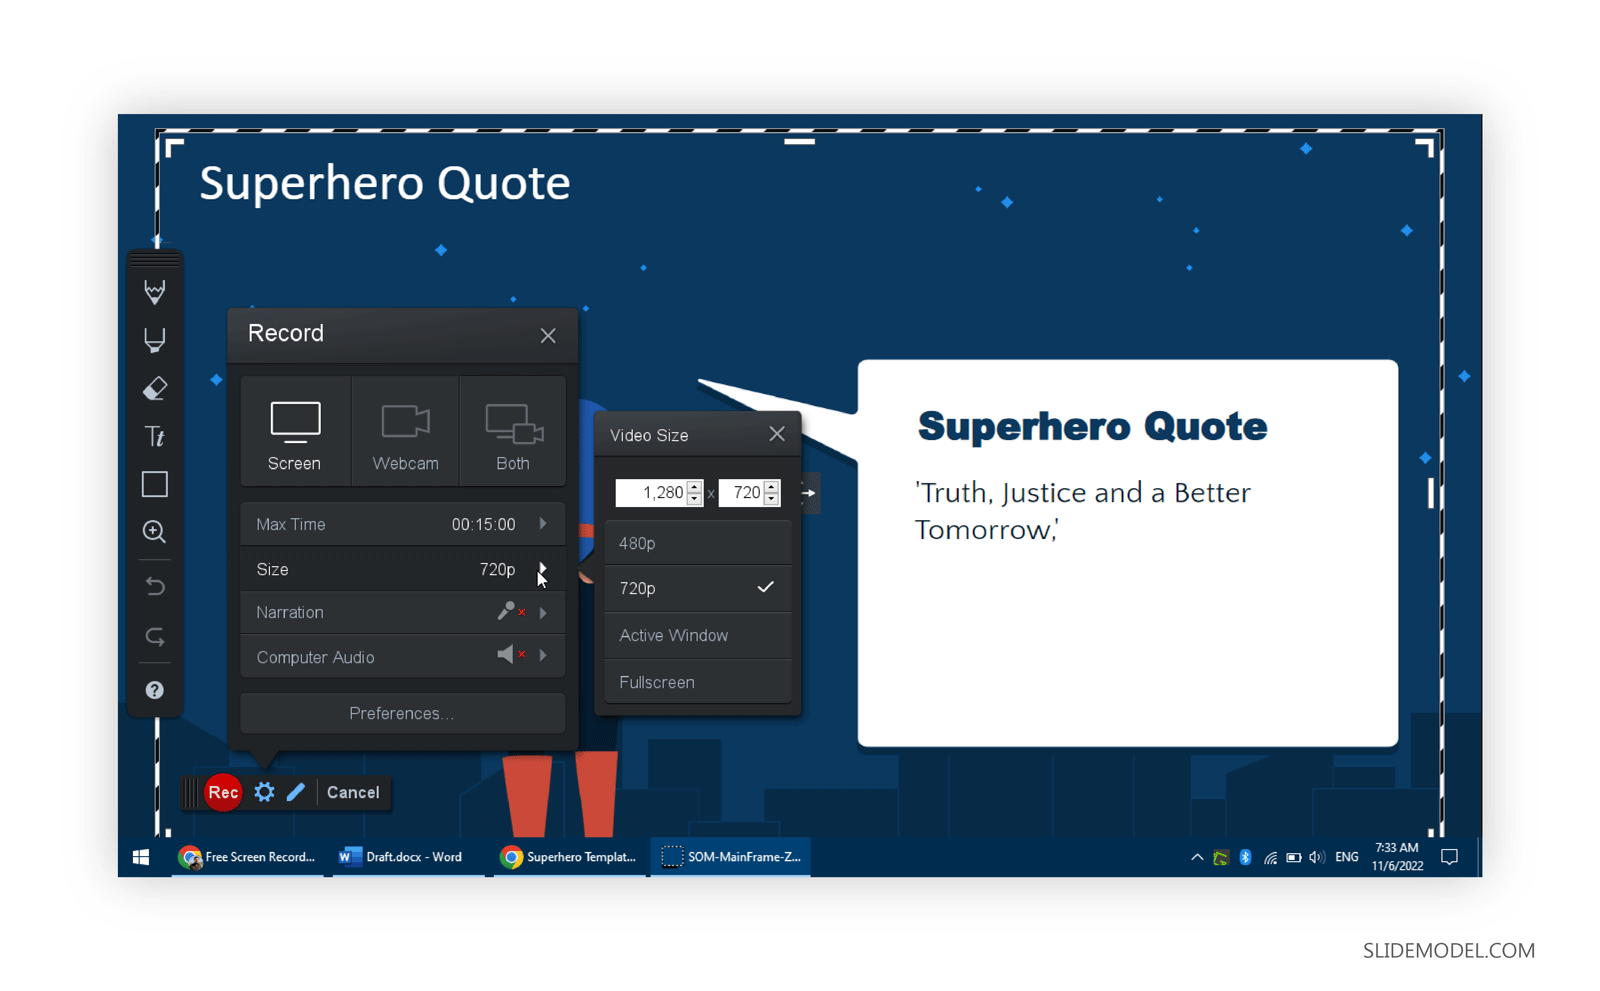
Step 3 – Select Screen Recording Settings
Select the area to record, video resolution, and a few optional features before proceeding further. These optional features include the ability to narrate audio by enabling the mic, enabling the camera, and capturing desktop sounds. Once you’re ready to present, click the Record button to start recording.
Note: It is always handy to know the hotkeys for your screen recording so that you can instantly start, pause, and stop recording. See the product page or developer’s instructions for the hotkeys of your screen recording app. You might also find them in a menu or just before you launch a recording. Alternatively, you might need to pause or stop recording via the system tray or onscreen option.
Step 4 – Record Your Presentation
Depending upon your screen recording app, once you start recording your presentation, you can narrate the slides, and annotate content as you present. If you feel the need to take a break, Pause the recording. Once you hit Stop, the recording will conclude.

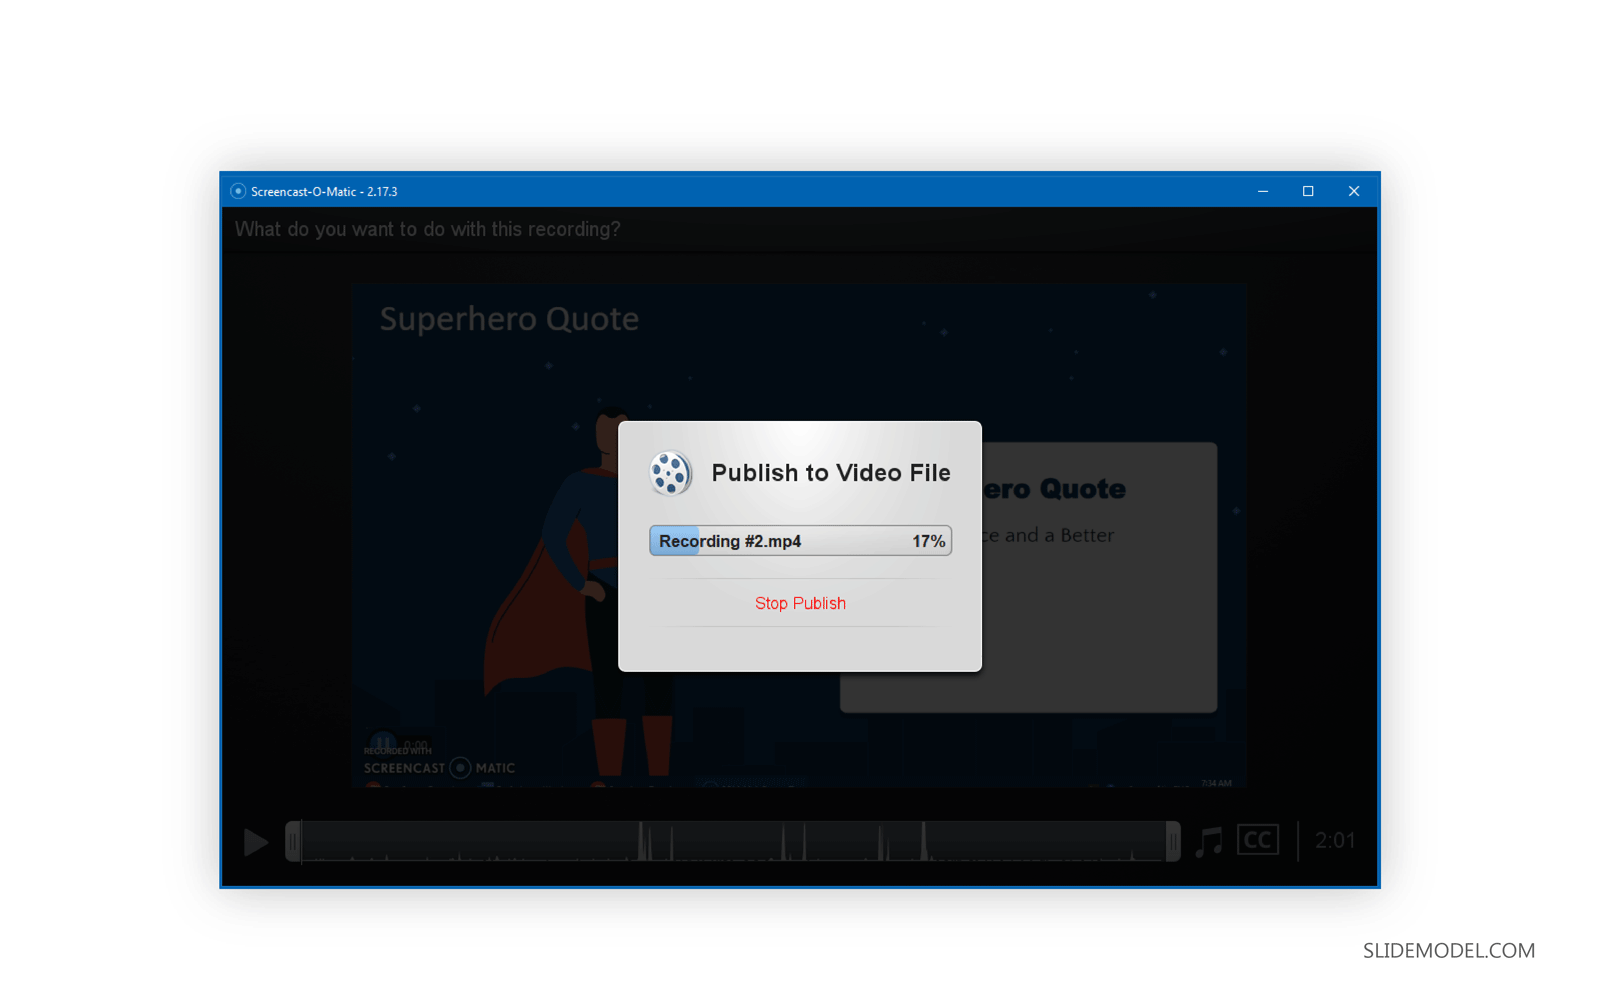
Step 5 – Turn Google Slides into Video
Screen recording apps come equipped with multiple features that can help turn Google Slides into video. You can either directly upload the video to YouTube or a file-sharing app like Google Drive or save it offline. If you’re looking for a file format that is universal, turning Google Slides to MP4 is the best option. Since other file formats like MKV, MOV, or WMV are not supported by all video players and video streaming websites.
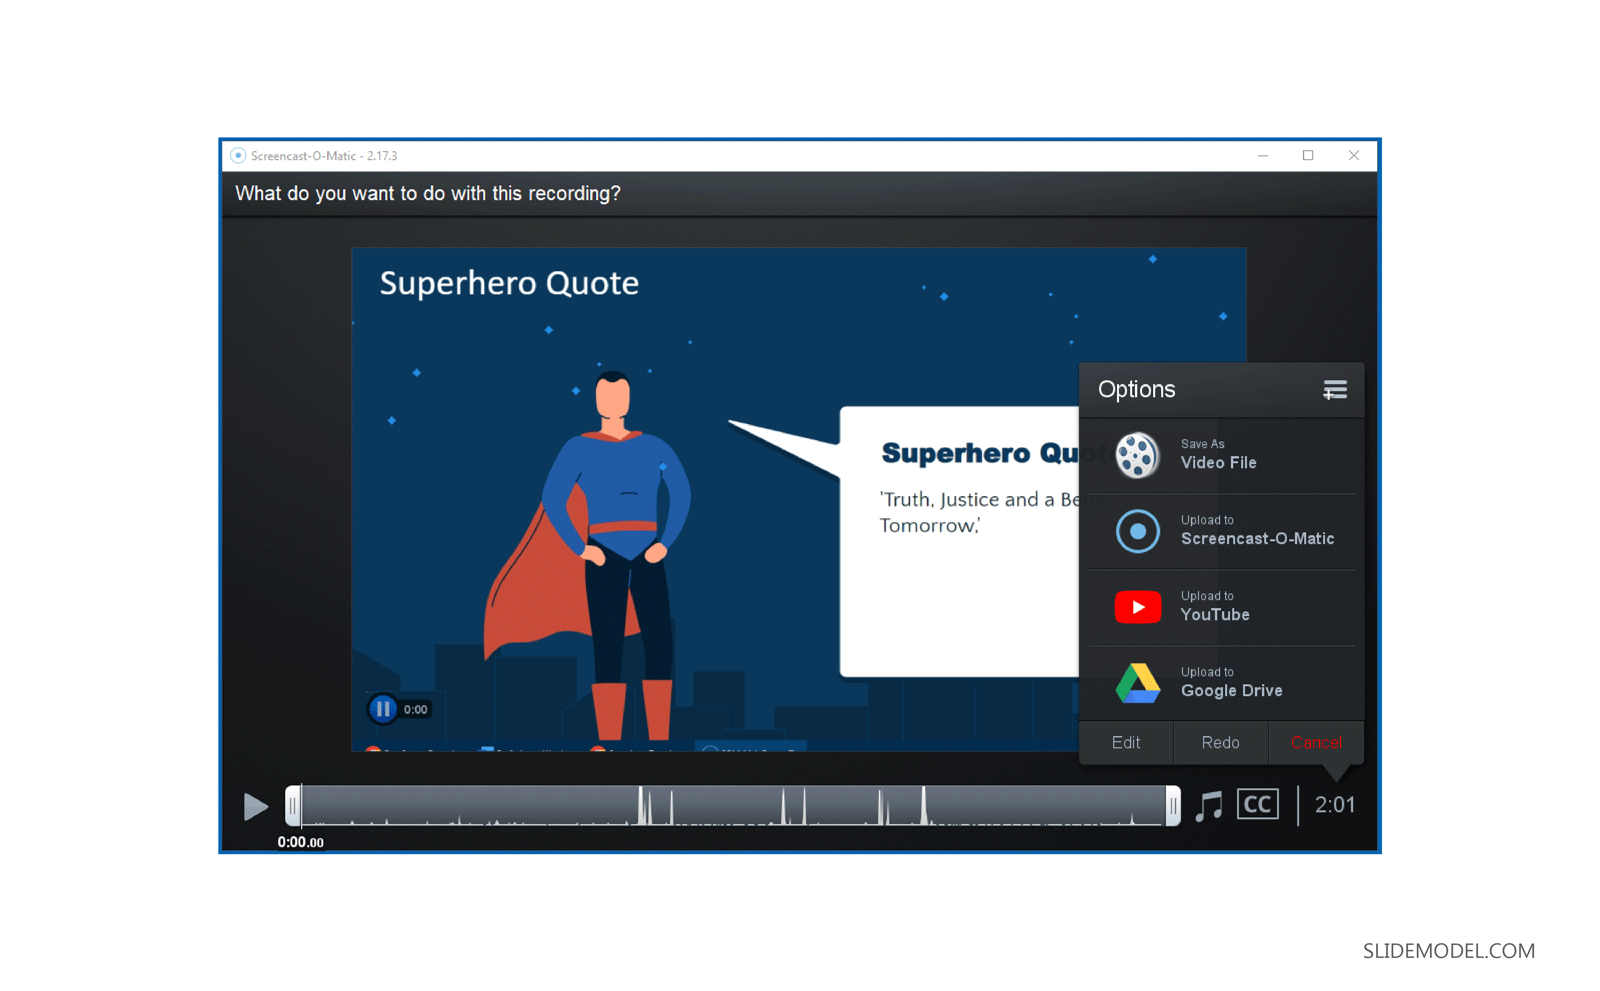
Once you select the desired file format, the file will start rendering and might take some time before it is ready for use. Once ready, you can play to preview if everything is according to your liking.
Convert Google Slides to Video Using PowerPoint
If you’re wondering how to turn Google Slides into a video using PowerPoint, there is an easy method to do that as well.
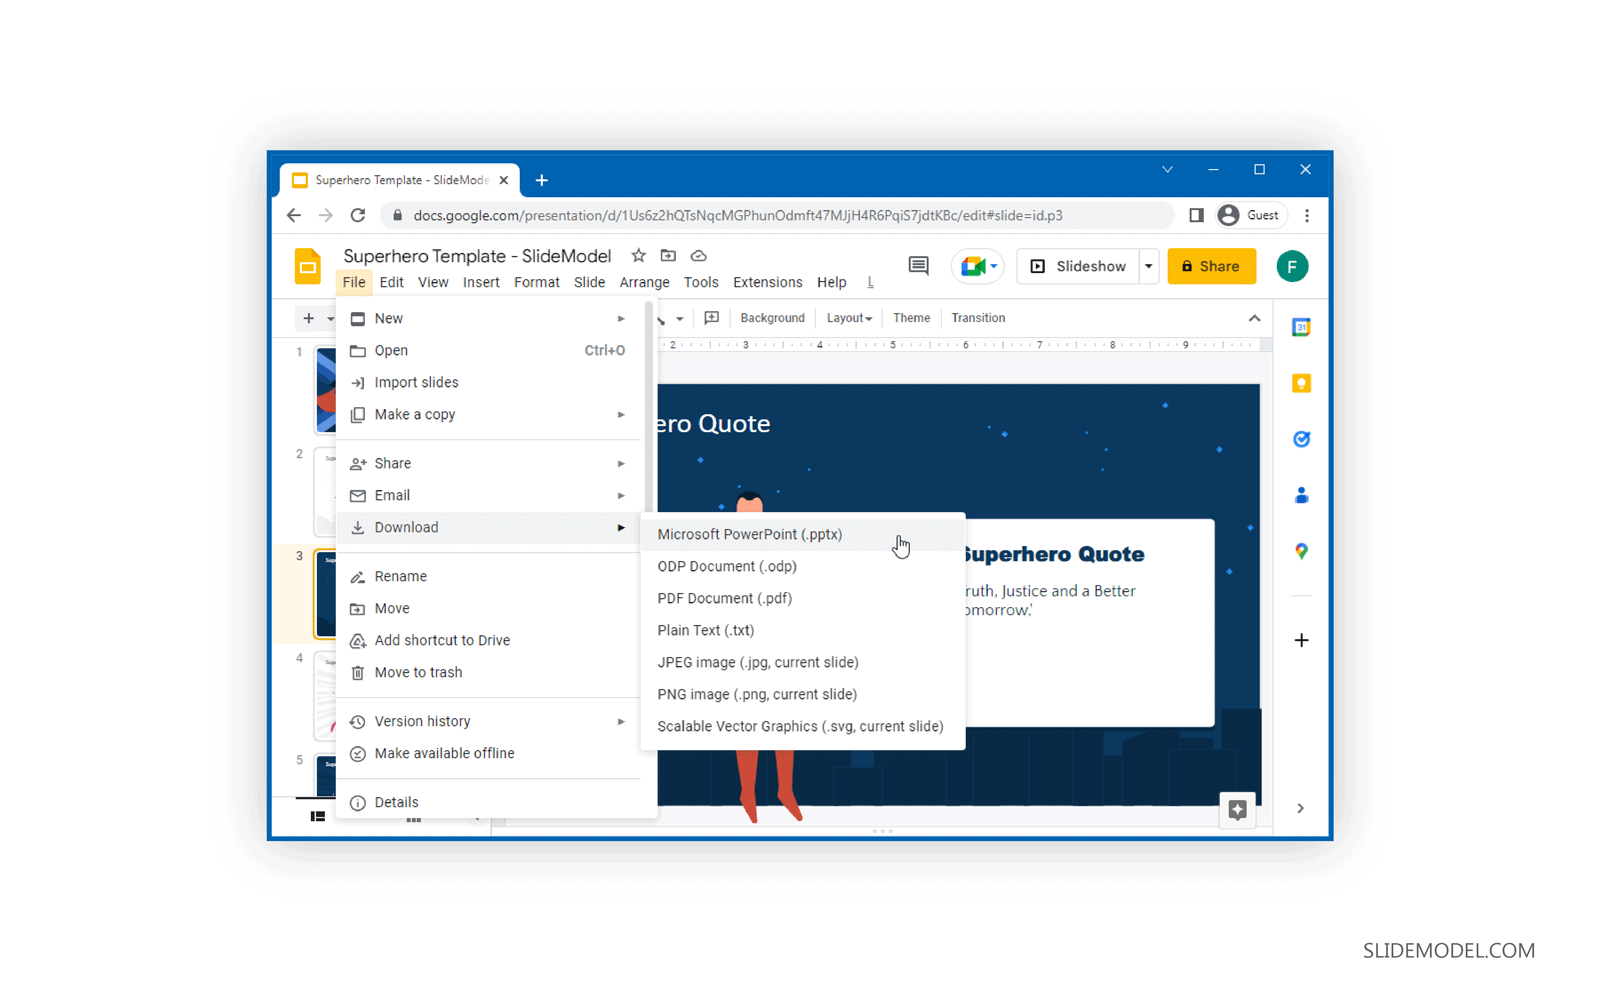
Step 1 – Download Google Slides Presentation
Download Google Slides presentation via File > Download as a PPTX file to your computer.
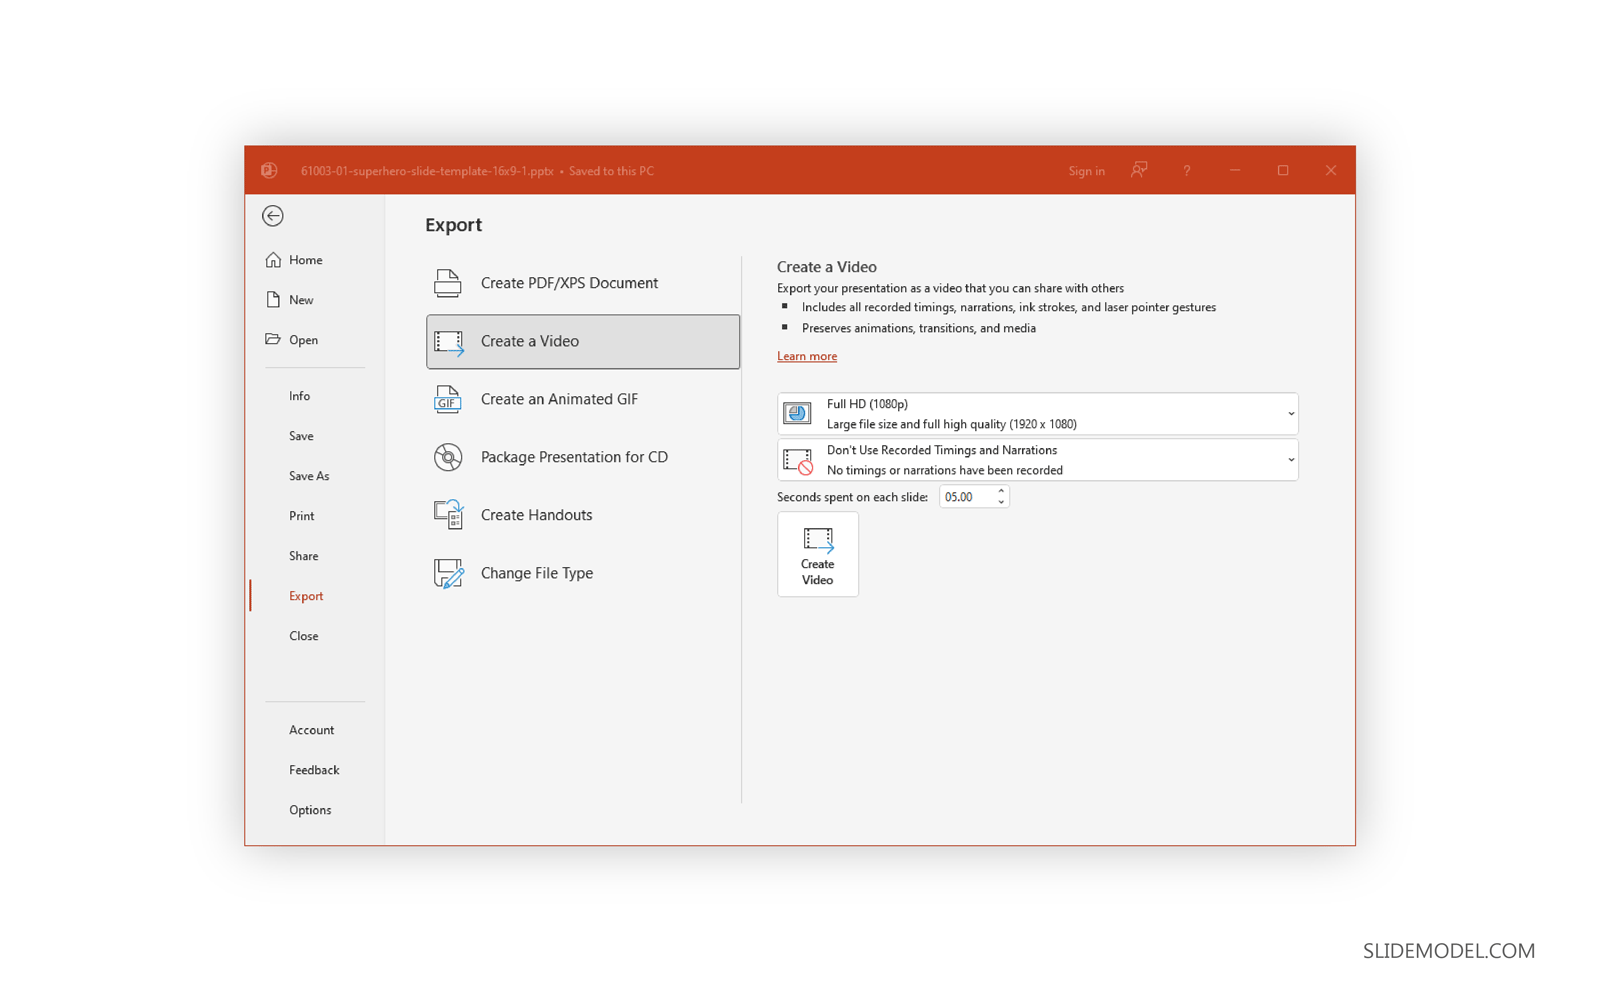
Step 2 – Export Presentation to Video
Open your downloaded presentation file and go to File > Export in PowerPoint > Create a Video. Using this option, you can export your Google Slides presentation to a video format using PowerPoint. If you are looking for more information, we recommend our article on How to Convert PowerPoint to Video to learn about what resolution and output formats you can use with the exported video.
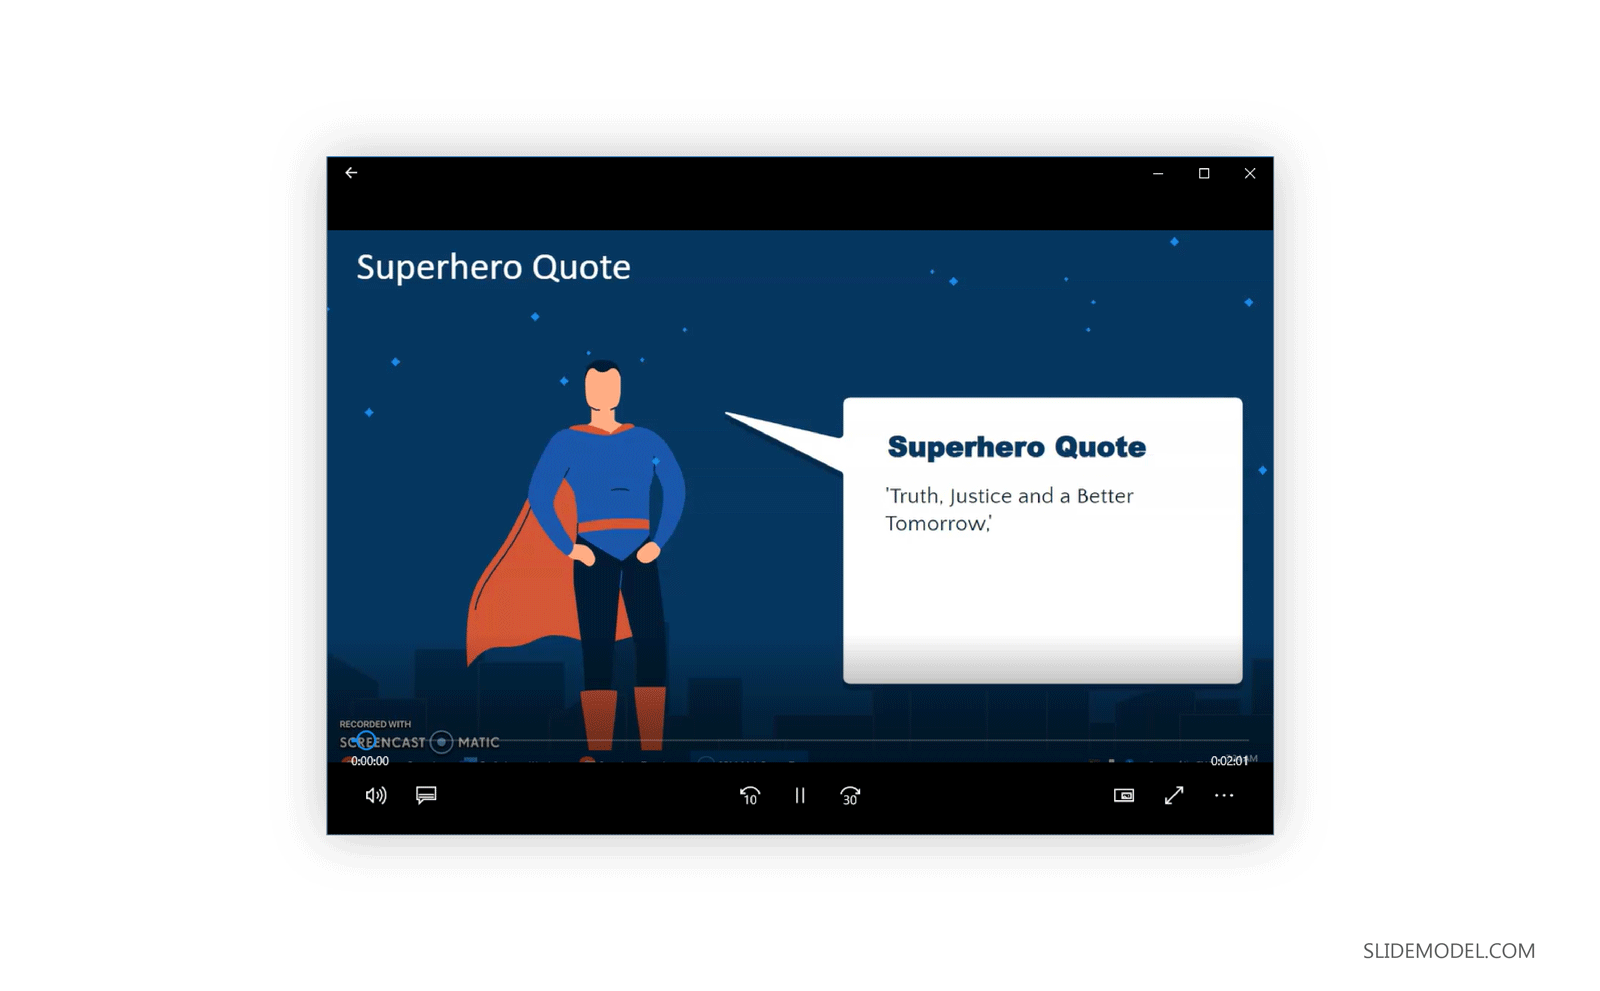
And that’s how to turn Google Slides into a video using various methods that can provide you with the flexibility to convert your slides to a video format with a level of customization that best suits your needs.
When converting your Google Slides presentation with PowerPoint, you can also narrate your presentations and get all features you would get with a standard screen recording app. However, if you don’t have PowerPoint installed or wish to use an alternative method, the Creator Studio Add-on or a screen recording app can help you convert Google Slides to video.
Like this article? Please share
Google Slides, Presentation Skills, Presentation Tips, Presentation Videos Filed under Google Slides Tutorials
Related Articles
Filed under Google Slides Tutorials • December 10th, 2024
How to Record a Presentation on Google Slides
Create powerful educational content by learning how to record a presentation on Google Slides. Ideal for webinars, lessons and more.
Filed under Google Slides Tutorials • November 26th, 2024
Does Google Slides Have Design Ideas?
Is Google Slides able to help us define design ideas for our slide deck? Do we need extra plugins? Find all the answers here!

Filed under Presentation Ideas • November 19th, 2024
What is the Best Way to Deliver Presentations with Authenticity
Do you feel as if your presentations look dull or robotic? Discover how to bring authenticity to your slides and speech with this guide.
Leave a Reply

COMMENTS
Nov 19, 2024 · How to Turn a Google Slides into a Video with Voiceover . To save Google Slides as video: Use the keyboard shortcut Win + G to open the screen recorder settings. Click on the mic icon to unmute and be able to record the sound. Open your Google Slides presentation in a web browser. Adjust the browser window size to fit the desired video dimensions.
Oct 9, 2022 · By converting the slideshow to a video or GIF, your visitors can watch it as you intended. Here are three methods to try. Convert Using PowerPoint Microsoft PowerPoint offers both video and GIF exporting. So, if you have PowerPoint, you can open the Google Slides presentation in it and create the video or GIF from there.
Mar 7, 2024 · 3. Using Canva Canva, a popular design platform, allows you to import your Google Slides presentation and convert it into a video. With its user-friendly interface and pre-designed templates, Canva is a great option for creating visually appealing video presentations without extensive editing skills.
This method is best when you want to use another video editor to create a custom video. Step 3: Use Google Slides’ Built-in Feature. Google Slides doesn’t have a direct “export as video” option, but you can still get the job done. Click on “File” > “Download” > “Microsoft PowerPoint (.pptx)”. Open the file in PowerPoint. Use ...
Dec 15, 2022 · How To Convert Google Slides To Video. It’s a very easy tutorial, I will explain everything to you step by step. Subscribe To How To Mentor for more help in ...
Learn how to convert, create, and share Google Slides as videos with our step-by-step tutorial on Export to Video! In this video, we'll guide you through the...
Jan 11, 2023 · To export a Google Slides presentation to PowerPoint and use it to save it as a video: Open the Google Slides presentation that you want to convert to a video. Go to File > Download > Microsoft ...
Feb 24, 2023 · In this article, I’m going to share with you 3 different methods (all FREE) to convert your Google Slides presentation into a video. So, let’s get started! Method 1 – Export Google Slides to Video using PowerPoint. Google Slides does not have the option to directly convert presentatations into videos. However, there are a few easy ways to ...
Jan 3, 2024 · The easiest way to convert Google Slides to video is by first exporting your presentation to PowerPoint, which lets you save the file as an .mp4 video. Here is the step-by-step process: Open your Google Slides presentation and go to File > Download > Microsoft PowerPoint (.pptx). Save the PowerPoint file on your computer and open it.
Aug 9, 2022 · Step 1 – Download Google Slides Presentation. Download Google Slides presentation via File > Download as a PPTX file to your computer. Step 2 – Export Presentation to Video. Open your downloaded presentation file and go to File > Export in PowerPoint > Create a Video. Using this option, you can export your Google Slides presentation to a ...